A customer running Horizon with Windows 10 recently inquired about performing in-place upgrades on their templates. Typically, I would recommend building a new template for a major OS upgrade; there’s often many GBs’ worth of redundant bloat that remains dormant in the file system after an in-place upgrade.This can be detrimental for storage, performance, and general housekeeping of the desktop image.
On this occasion, a new template build wasn’t feasible, so we had to go in-place.
Before starting, clone the VM and test the process first. It’s easy to break Windows 10 if firmware or BIOS settings are misconfigured in vCenter. The following steps assume prerequisites for Windows 11 are already in place, including a native key provider configured in vCenter.
For background information on vTPM in vSphere I recommend the Q&A on vTPM from VMware and the Broadcom guidance; albeit the latter doesn’t explain the disk partition issue covered below, so take this into consideration before proceeding.
Environment: VMware Cloud on AWS
Scale: This process is for a single VM and doesn’t cover automated/batch upgrading.
Operating System: Windows 10 Enterprise 22H2 to Windows 11 24H2.
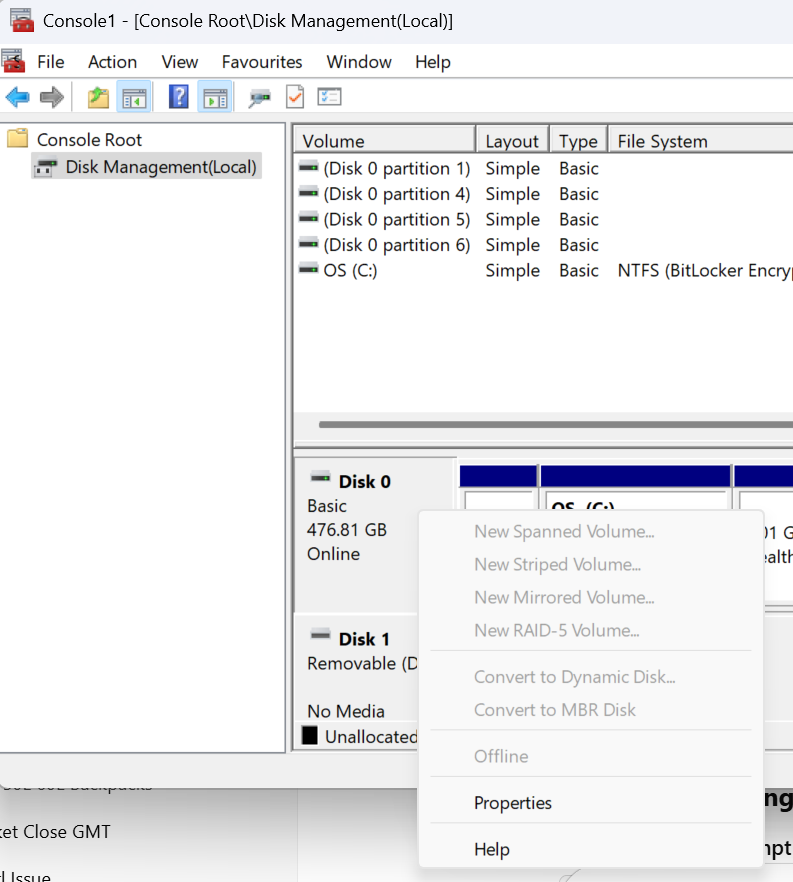
4. Once the partition type has been converted successfully, shut down the VM. vTPM devices and boot/firmware configuration changes can only be performed on powered-off machines.
5. Configure secure boot on the VM by browsing vCenter > select the VM > Edit Settings > VM Options > Boot Options and set the Firmware: EFI and Secure Boot: Enable > Save.
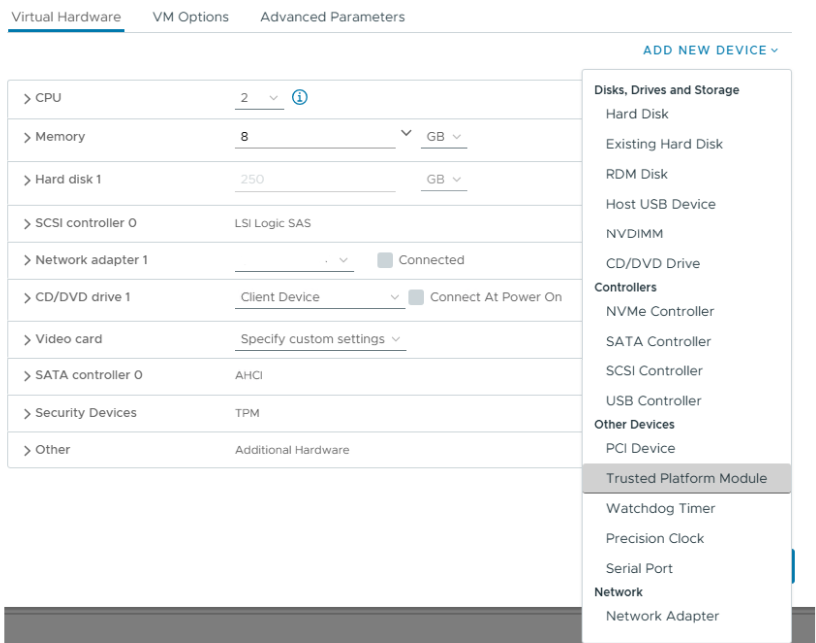
6. To add a vTPM device Virtual Hardware > New Device > Trusted Platform Module. The vTPM will add to the VM and you can see the default VMCA-provided certificates are pre-populated. No further steps are needed.
7. At this point the vTPM configuration is in place and the VM is ready to upgrade to Windows 11.
I decided to run the Windows 11 installation assistant to validate the machine configuration, and after the validation the wizard will automatically progress to an online upgrade to Windows 11 at the same build (Enterprise/Professional) as your existing installation.
Don’t forget to run Omnissa OSOT tool if you plan to use the virtual machine as an Horizon template.
Enterprise IT transformations from persistent to non-persistent desktops always bring new challenges with application delivery and profile management. I’ve used a variety of profile management tools from DEM and Profile Unity to Ivanti Environment Manager and FSlogix and they all have their respective strengths and weaknesses. I hope you find it useful!
Scenario: An application delivered as an AppVolume package requires user settings to be present on the local machine c:\ at launch time and roamed at logoff.
Typically I would tackle this issue using a combination of DEM logon tasks and DirectFlex. A shortcoming of DEM is that it cannot roam C:\ data using application templates. To work around this constraint, a logon task can be used to import the configuration files as a one-time event. DirectFlex can be enabled (optionally) if needed. At logoff, we can use a script to move the files to %roamingappdata% location. An application template can pick them up there.
Why didn’t this work?
There were various Windows Smart Screen and UAC challenges initially. Scripts needed unblocking, and I had to create a DEM Elevated Task to execute them. After some wrangling, the logon scripts worked, and the configuration was copied from a network share to the local machines C:\ at logon. Success! However, the export job failed. The copy job from C:\ to %appdata% failed sporadically, I suspect, due to the AppVolume package detaching from the VM before the files could be copied.
Enter:Symbolic Links
Symbolic links are like an evolution of the Windows shortcut. A symbolic link can point to a file or directory in another location and be deployed via group policy or DEM. These can be used as an elegant function to circumvent the aforementioned DEM configuration. It’s particularly useful for applications that don’t store their configuration in local or roaming %appdata%.
Example
In this scenario, we need a directory from a remote location to be available on a VM C:\ root after the Appvolume package has attached.
There are 2 types of symbolic links: soft links or hard links, and they can point to directories or files. In this scenario we’ll point to a directory that is known as a junction link
mklink /J "<location>\<dir>" "<\\UNC or <dir>"
The application will see the directory as a native file system folder:
Summary
This was a really useful discovery for me personally. No doubt there are plenty of veteran techies reading this and thinking, ‘Nobody reads the CMD prompt manual these days!’—and you’d be right. I feel somewhat naive for having not discovered this years ago, having wrestled with countless profile issues where an application writes to %Programdata% or C:\.
On this thought, one area where Ivanti Environment Manager shines is in managing these types of scenarios. It does a better job than DEM at picking up dynamic changes to non-appdata locations. Equally, where DEM only operates at logoff/logon and triggered tasks, Ivanti can capture on-the-fly changes to the operating system directories. However, there is an infrastructure footprint required to run Ivanti EM; which is where DEM shines in providing excellent value whilst displacing incumbent profile systems.
I hope you’ve found this useful; please comment below if you’ve had good or bad experiences with symbolic links!
I wanted to share the maintenance procedure I used recently for a customer. We needed to power down their Horizon workload clusters and gracefully place all instant clone desktops into a maintenance state. I wasn’t aware of the vSAN Shutdown Cluster wizard feature and the magic that it performs. It saved me a lot of time. Several of my colleagues weren’t aware of the feature either. I’ve shared the process below.
The next steps explain how to power off instant clone pools, desktops, vCenter, and parent VMs. The process assumes all user sessions can be logged off and the pod will be unavailable. This is useful if you need to undertake cluster maintenance requiring a total power down of all ESXi hosts and Horizon workloads.
Log off any active user sessions
via Horizon Admin console > Sessions > select all available sessions > Logoff Session. Await completion and make sure no active sessions are in use.
Place all desktop pools into Disabled state:
via Horizon Admin console, select Desktops > select all pools > Disable Desktop Pools.
At this point, all desktop pools are unavailable for use and there are no users logged onto the platform.
The next step is to disable the Parent VMs. Although this step is optional, I include it here for awareness. From my testing, I found it prevented the instant clone VM’s from rebuilding when you shut them down.
Disable Parent VMs
via Horizon Admin console > Servers > select the vCenter instant > More > Disable ParentVMs.
This next step prepares the Horizon agent for powering off on an instant clone.
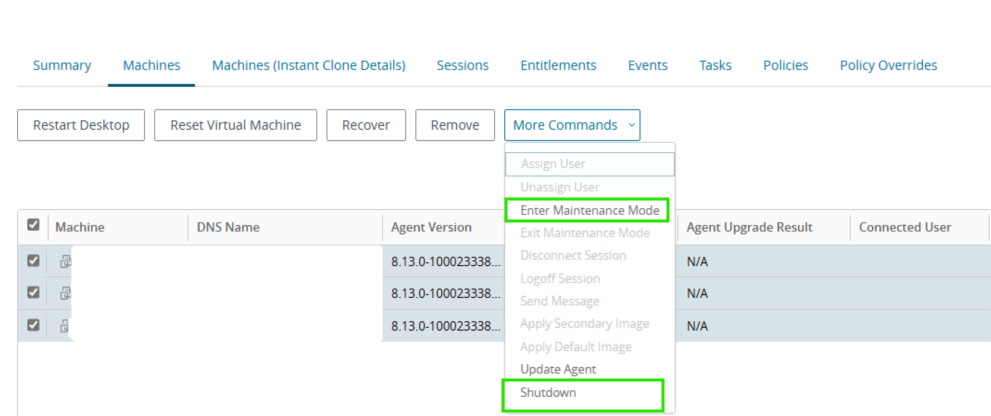
Place all instant clone pool desktops into maintenance mode
Select Desktops > target pool > Machines > select all > More Commands > Enter Maintenance Mode
By disabling provisioning, we avoid any new machines being rebuilt and generating problem VMs. We then power off all Horizon-managed VMs and the cluster hosts, and vSAN can be prepared for power down.
Disable provisioning on all pools:
via Horizon Admin Console > Desktops > select all pools > Disable Provisioning.
Shutdown all instant clone pool VMs
Select Desktops > target pool > Machines > select all > More Commands >Shutdown. Monitor the progress in vCenter.
At this stage, all Horizon desktops and RDS hosts should be powered off, with vCenter performing no provisioning or Horizon-related actions.
We can now continue with preparing the vSAN cluster and all hosts to shut down. The shutdown wizard will:
Turn off HA
Power off all system VMs
Disable cluster member updates from vCenter for all hosts in the cluster
Pause state changes of vSAN objects
Put each host into maintenance mode
Power off each host
vSAN Cluster Shutdown Wizard
Right click the Cluster object in vCenter > vSAN > Shutdown Cluster.
Note, if Shutdown Cluster is greyed out, browse to Configure > vSAN > Services > Shutdown Cluster
vSAN Restart Cluster
After successful maintenance, power the hosts back on via their iDRAC/iLO/Management interface.
All the hosts will power on and reconnect to vCenter in maintenance mode. To reinitialize vSAN and power the Horizon workloads back on, follow the below steps:
Right click the cluster object vSAN > Restart Cluster.
Once all hosts are participating in the cluster, select the cluster object > vSAN > Skyline Health > Test. Remediate any issues.
Power on Horizon Workloads
Enable ParentVMs for all desktop pool
via Horizon Admin Console > Servers > vCenter > More > Enable ParentVMs.
Enable provisioning on all pools:
via Horizon Admin Console > Desktops > select all pools > Enable Provisioning.
Exit Maintenance Mode for all desktop pools
Select Desktops > target pool > Machines > select all > More Commands > Exit Maintenance Mode
Enable all desktop pools:
via Horizon Admin console > Desktops > select all pools > Enable Desktop Pools.
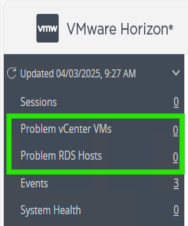
At this stage all Horizon workloads should be powered on and healthy. Review the Problem vCenter VMs for any issues and test provisioning by deleting some instant clone VMs.
Summary
There was some trial and error involved when I initially approached this procedure. The majority of cluster maintenance rarely requires a full power down, so Horizon workloads can be vMotioned between operational hosts. In this instance, we can gracefully shut down all the instant clones. vCenter can manage the vSAN and host power down. There is no need to log on to the hardware until bring-up. I love getting feedback or other tips, so please comment below.
I’ve used the below process several times during failed upgrades or downsizing of a Horizon pod. I’ve become strangely well versed with this procedure after working with a customer using Horizon 2111.2 and seeing various errors during upgrades that gave us no fix-forward choice, despite Omnissa support involvement.
The process combines the Omnissa guidance and some tips from Omnissa GSS.
Before Starting: Check FSMO Schema role owner
This prerequisite ensures you don’t see replication errors between the remaining healthy pod members. This can happen if you were to accidentally uninstall a connection server that was holding the local/global schema roles. If required, seize the role owner to another connection server instance.
Check the configuration and schema role owner and seize it to another connection server
From a connection server instance, open LDP.exe > Connection > Connect > localhost
Connection > Bind > Select Bind as currently logged on user
Click View > Tree > select CN=Schema, CN=configuration from the drop-down menu.
4. Search for the output for the text string “fsMORoleOwner “. The hostname of the owner will be displayed.
5. To seize the role to another connection server, first log onto the server you wish to seize the role.
Run the below command from an elevated command prompt. If the horizon pod has CPA enabled, there will be a Schema master for the local ADAM database. There will also be one for the global ADAM database. Remember to assign both roles to a different server.
6. Disable the connection server in Horizon Administration console by logging into https://ConnectionServer.domain.com/admin > Servers > Connection Servers > select target > Disable
7. Uninstall the components from appwiz.cpl or Add/Remove Programs: Horizon Connection Server, HTML Component, VMwareVDMDS and VMwareVDMDSG.
8. Remove VDM registry keys.
Right click HKLM\Software\VMWare…\VDM> Permissions > Advanced > select ‘Replace all child object permission entries with inheritable permission entries from this object’ > Apply > Ok.
Delete the parent key: HKLM\Software\VMWare…\VDM
9. Open the local Certificate Store > Personal > VMware View Connection Server > Delete all certificates within the store.
10. Reboot the server.
Remove references to unwanted connection server via vdmadmin
11. Use the below vdmadmin command to remove references to the unwanted connection server in the ADAM database. This command must be run from another connection server instance and is case sensitive.
cd C:\Program Files\VMware\VMware View\Server\tools\bin\

vdmadmin -S -r -s <NetBIOSName>
Check replication health
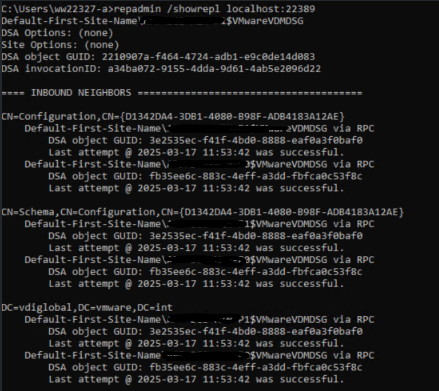
11. From any connection server instance command prompt, check replication health on the local ADAM database. The local ADAM database uses port 389. You can also check the global ADAM database, which uses port 22389.
The output should display replication connections between the existing local pod members, and for CPA, remote pods.
12. Login to the connection server administration console and verify the node has been removed from the list of connection servers.
Summary
After removing the connection server, the installation directory in Program Files will still contain some configuration files. This is intentional. It can be useful if you choose to rebuild the installation. It is also helpful if you need to back up the old configuration.
Windows Defender AV for non-persistent instant clone desktops is a lightweight and free AV solution for VDI that is growing in popularity as an alternative to typical third party options as people move to O365 and want to align themselves with Microsoft across their software stack.
Below is a quick guide on how to configure Defender for Endpoint (not ATP) which is a free version of Defender included with E3 O365 licensing using.
A file share is used as the source for definition files. I recently had to setup a proof of concept of this for a client who had been using McAfee ENS and we saw a notable improvement in performance and overall desktop experience.
The guide does not cover how to configure VM’s to use MMPC, WSUS , Cloud based definitons or ATP/MAPS.
Environment: VMWare Instant Clones, Win 10 1909.
What you’ll need…
1x SMB file and an endpoint for handling the scheduled tasks needed for Defender definition updates
2x scheduled tasks, one to perform the definition download and unpack, and a second to clean-up old definitions. Both scripts provided.
VDI specific Defender settings that are configured on local group policy on the master image, and remaining settings configured on domain group policy.
Before getting started..
Check you have the latest ADMX templates for your OS.
Use a clean build, ideally with an image that has not had any AV agent installed previously.
Step 1: Setup a share and scheduled tasks to download, unpack and clean-up definitions…
Identify a virtual machine/server/desktop or some endpoint that will be responsible for running the scheduled tasks for fetching definitions and storing them in an SMB file share. The endpoint will require internet access and I refer to this machine as the management VM.
Create an SMB file share to store definitions.
Setup a file share that will store the unpacked definitions. The below example resides in C:\wdav-update on the management VM. I recommend using the same folder names as this will tie together with the download script that will be used later on.
Get-SMBShareAccess -name wdav-update result should mirror the above
*IMPORTANT* if you provide FULL CONTROL to the folder or share, then you may experience the definitions being automatically purged by the child VM’s after they self-update, making the definitions unavailable at next boot . From my limited testing this behaviour appeared to be by design can’t be controlled by any GPO settings, so avoid this by setting the NTFS permissions correctly.
Create scheduled tasks to download definitions
Microsoft provide the following PS script which handles downloading and unpacking of definitions. There is an alternative script available here but I found the below script does the job and is easier to understand. Adjust the value for $vdmpathbase accordingly, but do not change the [0000…] folder naming convention. This is required otherwise the child VM’s will not be able to parse the folders and will fail to self-update.
-Configure definition update to run every 2 or 4 hours , typically MS publish new definitions twice per day, around 8-12 hours between each update.
– If the scheduled tasks are failing, ensure the account used to run the task (local SYSTEM or service account) has internet access – you may need to allow unauthenticated traffic from your management machine if using the SYSTEM account. If you use a zScaler/Proxy device and authenticate clients using a .pac file then you may need to launch IE as the SYSTEM account (on your management VM) and configure the .pac file accordinalty. To do this , download PSExec and run the below command to launch IE in the context of SYSTEM, then configure the .pac file in IE settings.
Step 2: Configure Defender local group policy settings on your master image
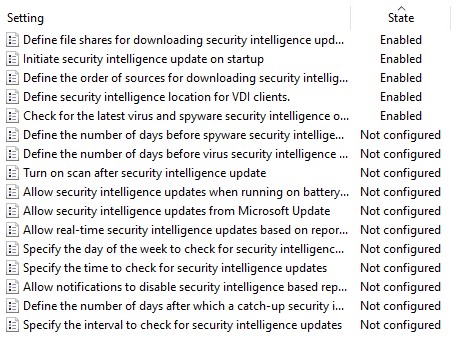
Defender for non-persistent VDI relies on several localgrouppolicy settings being baked into your image to ensure they are available at boot time. Configure the following 5 settings via gpedit.msc on your master image.
IMPORTANT: You must configure Define security intelligence location for VDI clients andDefine file shares for downloading security intelligence updates . If you do not configure both, the service will not work.
Values to use:
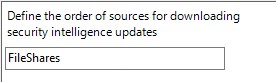
Define the order of sources for downloading security intelligence: FileShares
Define Security intelligence location for VDI clients: \\yourfileserver\wdav-update
This concludes the minimal settings that are required on the master image.
TIPS FOR LOCAL POLICY CONFIGURATION
You may want to use LGPO.exe to export a template of the Defender settings for your environment for quick setup in future, or add to an MDT task-sequence for your image builds.
If your master image has picked up policies you don’t need or for some reason you’ve had your hand forced to use a crappy image – you can wipe all the local and domain policy by running the below command (elevated). This will wipe all local policy WARNING – do this at your own peril (it will remove OSOT optimizations and all domain+local policy). Remember to re-join to domain and update policy afterwards.
If your enterprise has never used Defender before and/or has used a different AV product to date, then it’s highly likely you’ll have domain policy in place to disable Defender and/or your base image will have no pre-existing Defender engine/definitions installed. In this case, you may have to install a baseline definition pack so the Defender engine is activated in the build. This may not apply to all environments but I experienced VM’s failing to update on their first boot because no existing definitions were installed. If this happens, Download the latest definition set from Microsoft and install the mpam-fe.exe file – this will install a definition pack and give you an engine status/last updated point to work from.
Step 3: Configure Defender domain group policy settings…
There’s a plethora of settings for Defender and I won’t cover every setting here. The high level suggestions are covered in the Microsoft blogs – so refer to these, but also be aware that services like MAPS and ATP rely on many of the options available – and we’re not configuring these services in this blog post – only the ‘barebones’ AV product. Some examples of VDI-friendly settings you may want to use are below.
Important: do not configure any of the settings configured in Step 1 on the master using local policy on our domain group policy.
\Windows Defender Antivirus
Turn off windows Defender: Disabled
Randomize Scheduled tasks times: Enabled
\Scan
Allow users to pause scan: Disabled
Check for the latest virus and spyware security intelligence before running a scheduled scan: Enable
\Security Intelligence Updates
Specify the interval to check for security intelligence updates: 2 hours
Step 4: Verify that it all works!
So lets recap on what we’ve done;
We’ve setup a file share and it’s populating every 2 hours with the latest definition files, unpacked, and ready to be read by our VM’s. We have the necessary NTFS and share permissions in place to make our \wdav-update share accessible from the VM’s and it can be read/written to by the SYSTEM account and/or your service account responsible for running the scheduled tasks.
Your master image has the necessary local group policy settings required at boot so the VM’s should be reading from the share and self-updating at every logon, and this should be reflected in the Virus and Threat Protection console in Windows on the VM’s, example below.
Your domain group policy settings are configured to manage things like scan times, quarantine behavior, UI and notifications etc and critically you’ve checked the Disable Windows Defender policy is set to disable..!
Spin up your VM’s and check the below log file – search: UpdateEngine – here you can see the subfolders in our definition share being traversed. The log output Skipped verification….Due to PPL is expected and this does not indicate an error. Any errors will be indicated in the entry that begins: UpdateEngine start:
%ProgramData%\Microsoft\Support\mplog.log
Virus & threat protection settings should show Last Update: today’s date
*Update 22/01/22 After much effort spent getting this to work at a customer site, it turns out there was never any need to have conditional access enforcing VDI devices to be hybrid-joined. By turning off the conditional access policy that checks the device is Azure-AD joined, there was no longer any issue. Note, if you’re using a zscaler you’ll need to configure source IP anchoring as well.
*Update 31/07/21 After migrating a customer from Appsense to VMware DEM I had to find a new method to perform the hybrid join. The below article now provides two methods for performing the join.
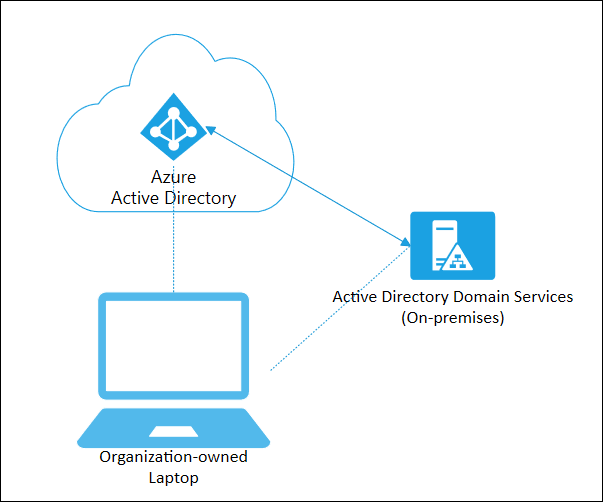
Read this post if you’re having problems performing Hybrid Azure AD join on non-persistent VDI. This post covers the how to configure Hybrid AD join on VDI , how we discovered it was broken and a clean solution to fix it.
The running environment was Windows 10 1909, VMWare Instant Clones on Horizon 7.10, with zScaler proxy (.pac files).
For the solution, click here or scroll to end of article.
How to configure Hybrid AD join and why it might be failing for you…
In our case, hybrid AD join was always broken – we just hadn’t noticed because the device join was successful which is all that is required for O365 services to work (Outlook gets a license – everyone is happy!) but the user PRT token (which I’ll refer to as user-join) was failing – which, if you have InTune in place for MDM policies and all that fancy stuff – you may find these devices are broken when the VDI is in use.
Microsoft offer very little guidance on how to implement Hybrid AD join on VDI but Google yields a lot of negative feedback from folks implementing this for VDI. This VMware thread was helpful in our discovery, and the guidance from Microsoft is helpful, but not as detailed as it should be.
Microsoft’s suggestions are:
Implement dsregcmd /join as part of VM boot sequence.
DO NOT execute dsregcmd /leave as part of VM shutdown/restart process.
A .bat file or powershell can perform the join as follows, and configure this to run as a start-up task. Note, the task should be ran under the context of the SYSTEM account, and ensure your network is configured to allow this traffic (see zScaler section).
dsregcmd.exe /join
Master Image
You should ensure your master image does not perform an AAD join at all. You should run the /leave command as SYSTEM account prior to sealing your image and taking a snapshot, although we would often forget to do this. Whether this contributed to the issues covered, I’m not sure. Additionally, some threads suggest your master image should not be domain-joined – in our case, the master image IS domain joined, but was NOT AAD joined.
Use PSExec to perform a /Leave command as SYSTEM account:
Psexec -I -s dsregcmd.exe /leave
zScaler .pac on VDI for Hybrid AD Join
If you’re using a zScaler to manage internet traffic you may find that Hybrid AD join fails because the traffic is sent from the VM’s under the context of the SYSTEM account and if no .PAC file is configured against that account, then it will fail (unless you allow unauthenticated traffic on your zscaler devices). If we also throw into the mix that Microsoft recommend you join AAD during device start-up – your user will not have authenticated to zScaler when the /join takes place, so you must configure this.
On your master image, launch Internet Explorer as SYSTEM account, and then manually configure the .PAC file manually. Download PSTools and then run the following command from an elevated cmd prompt:
The above steps explain how we were configured for Hybrid AD join BEFORE we discovered it was not working. Read on for the discovery, and adjustments we made. Click here for the solution.
How to identify a VM has failed Hybrid AD Join
As a large enterprise with multiple VDI sites managed by different teams, we discovered some sites were performing the /join during the ‘Desktop Created’ stage of the logon process (i.e. once the user is logged In and desktop shell fully loaded) – in these pools we saw the device join was successful, but user join (PRT token)was unsuccessful – this is because the user was not logging into an AAD-joined device, so the device was deemed unauthorized to receive a PRT token.
Open cmd prompt and run: dsregcmd /status
Review the output –note you may also see that the Tenant Name is blank in your output. The device will show as joined, but no PRT/User join had taken place –
Device State shows successful AAD join:
User-join has failed and the AzureADPrt token is not present.
Contrary to MS guidance we experimented with adding a /leave command at logoff – on these pools we saw the object in AAD was updated more accurately in Azure – the ‘Last Activity’ times reflecting the join/leave times of when the desktop sessions were in use. However, the underlying lesson here is that the device must be joined first then the user is logging into an authorized device and a second/join should take place to fetch the user PRT token.
On the pools configured to use a start-up taskwe found the device join would periodically fail – but this became more frequent as time passed until we had complete failure of all devices in a given pool.
VM template objects flooding Azure AD
We searched AAD to compare on-prem device names to their records in AAD and discovered we had a ton of VM’s joining AAD under the machine name of itXXXX – this is the internal template object which is created by ESXi when a new snapshot is published to a desktop pool. AAD was being flooded with these objects every time we changed the snapshot on a desktop pool.
VM’s were joining AAD successfully (device-join only) but their ID did not match their counter-part object in AAD – instead, it matched the internal VM template.
At this point we knew that when a new snapshot was published, a new AAD object was being created with the VM’s template account ID. Additionally, it proved the /join was taking place too early in the logon process (at machine start-up) – and instead of joining the hostname of the VM that is provided by QuickPrep (e.g. PROD-VM-1) the ID of the instant clone template was being used to join the machine to AAD.
To verify this:
Open AAD and search for device name:“it“
Note, this applies to VMware Instant Clones environments only, Citrix and Hyper-V hypervisors will use a different provisioning process, check your vendor documentation to know what to search for)
Template VM objects in AAD –
Duplicate VM device ID’s
Another symptom of this issue was VM’s would recycle their Device ID – we found the same Device ID (after the device had joined AAD) was in use by other VM’s in the same pool. Presumably this is a hangover from previous symptom.
Take 2 VM’s from the same pool, open CMD prompt and run dsreg
cmd /status, compare the device ID’s on both devices – are they identical?
Verifying AAD Join process
To check if your VM’s are joining AAD with an incorrect computer name:
Check the local VM event log Applications and Services Log> Microsoft/Windows/User Device Registration for event ID 335.
Note, the computer name is itXXXX , user SYSTEM.
Let’s recap what we’ve learned so far:
VM’s are joining AAD with the wrong computer name
AAD is populated with stale records for our VM’s
Our VM’s are recycling device ID’s
The User-join (PRT token) is not working
After several hours of toil, testing and swearing, We tried moving the /join to different stages of the logon sequence, but only found Start-up to be ‘successful’ for the device-join. During testing we removed the /join altogether – and low and behold, we discovered the VM’s were still joining AAD – this is because there are 3 scheduled tasks baked into the Windows 10 1909 OS to perform auto-AAD join.
Microsoft don’t tell you this in their VDI guide because they prefer ‘the Community’ to figure it out…they’re real nice like that.
1/ Perform the /join operation TWICE, once at Start-up, and again before the desktop shell has loaded.This ensures the the Device and the User PRT token are both issued succesfully.
2/Ensure the dsregcmd.exe /join operation is managed by your profile management tool. Don’t try to mix combinations of scheduled tasks/group policy/profile tool.
3/ Delete the Automatic Device Join scheduled task. This was the root cause of all our pain. The task will perform a join under user context and has 2 triggers – a ‘special event’ and at logon.
4/Always perform dsregcmd /leave on your master image. Ideally, avoid the master image from joining AAD in the first place.
5/ (Optional) Add a /leave command at logoff of the VM. This is unsupported by Microsoft, the only benefit we found from including this was the ‘Joined’ and ‘Last Activity’ timestamp was kept up to date in Azure AD – but again, not supported.
6/ (Optional) Set the machine GPO ‘Windows Components/Device Registration/Register domain joined computers as devices‘ to disabled. This helps keep things tidy and you can be confident the join is only handled by your profile management tool.
**Alternative Method**
I recently had to decommission Appsense for a customer and move them to VMware DEM. In doing so, the method described above had to be changed. Although DEM can run tasks at Startup of the VM (it hi-jacks the native group policy startup/logoff scripts) which isn’t suitable for performing a /join because the template account for the pool is then joined to Azure AD. Which we don’t want. Thanks to some feedback on the DEM forums, I’ve found the below method works nicely:
1/ Configure a .bat file that has a /leave and /join. You’ll call this as the post-synchronization script when you configure the pool. Example file.
cd c:\windows\system32
dsregcmd.exe /leave
SLEEP 10
dsregcmd.exe /join
2/ Make the file available on your master image, ideally in the C:\ root somewhere and configure it as the post-synchronization script for the pool.
3/ You should now see the devices populate in AAD when the pool is being composed. When a user logs in , because the VM is now ‘trusted’ the PRT token should be issued. Microsoft does not support the /leave as part of non-persistent devices so I’ve ommitted this. It is possible to add a /leave command (perhaps as a shutdown script), but we’ve discovered no issues with leaving the devices joined in AAD indefinitely.
Master Image configuration
Step 1:Delete the Auto-Join scheduled task in Win 10 1909
On your master image open task scheduler: Microsoft > Windows >Workplace Join
Delete the Auto-Join task – this must be deleted and not disabled – because it’s a system task.
The remaining 2 tasks should be left in their default state – they should not require any manual intervention. If these tasks are disabled or not present on your image – then check OSOT or group policy if these are being deleted by an upstream policy.
Step 2:Remove your master image from AAD
Launch psexec from an administrative command prompt using: psexec.exe -i -s dsregcmd.exe /leave
You may see the below exit code 0.
Confirm the /leave was successful by checking AAD – you should not see the machine account, and the /status output should be as below.
/status output when device has left
Step 3:Remove existing itXXXX or stale records from Azure AD
Remove any of the stale device records from AAD. This should include the itXXXX devices , and any VM’s in pools your going to test in.
Step 4 (optional): Bake your user profile configuration into the master image
If you’re unlucky enough to use AppSense or a similar tool – you may have to bake your configuration into the master image. Other profile management tools may not require this step.
Profile Management Tool Configuration
Step 4: Configure the dsregcmd /join operations
Start-uptask:
Configure the 1st /join operation during Start-up of the machine (or machine boot).
2. Scope this to only apply to machines with your VM naming conventions – this ensure the correct devices join AAD, but also prevent the itXXX devices joining (or your master images). If you have no profile management tool, then this might work with scheduled tasks or a group policy object, but we did not validate this.
Pre-Desktoptask:
Perform a 2nd /join operation during the ‘Pre-Desktop’ stage– this is the point at which user authentication has completed, but the desktop is still loading. This should ensure the PRT is issued to the device, and also provides a backup to one of the scheduled tasks (re-sync) which does the same thing.
Has this fixed it for you?
1/ We no longer need to delete ‘stale’ AAD objects – there is only 1 AAD object per VM. Each VM joins to the same AAD object – no duplication, no dodgy device ID.
2/ When a new snapshot is published, we did not see the itXXXX devices appearing in AAD (clean joins!).
2/ User-join was always successful – this is probably because the Auto-Join scheduled task is not interfering with the registration process.
I hope this helps someone, if you find other solutions or suggestions to improve on this find I’d love to know
My tips for saving money, what you’re really paying for, study guide and advice for passing the VCP-DTM 2020 qualification!
The following post covers my personal experience in studying for the Official VMware Certified VCP-DTM 2020, achieved June 2020, the following steps are covered:
Step 1:Consider a vMug Membership
Step 2: Studying for Foundations 6.7 exam
Step 3: VMware Instructor led training [on demand]
Step 4: Preparing and Passing the VCP-DTM 2020 Exam
vMug membership will provide around £650 of overall savings for the DTM certification track and provide resources for a home lab and is a great insurance to have if you fear failing the exam (like I do)…
vMug costs around $200, but do a quick Google for vMug discount codes prior to signing up to save a further 10% on the signup fee.
You save around £550~ on the official VMware instructor-led training [on demand] or In-Class routes.
You get a total of 4x 20% exam discount vouchers – 2x for Foundations 6.7 and 2x for any VCP exam – saving you around £30 per re-sit, if needed. You also receive discounts for VCAP if you’re on that path.
You get evaluation licenses for a broad range of vProducts – including vCenter, Horizon Standard, View Composer and Identity Manager – which covers most of what you’ll need for the DTM route.
Sound great! But what’s the catch?
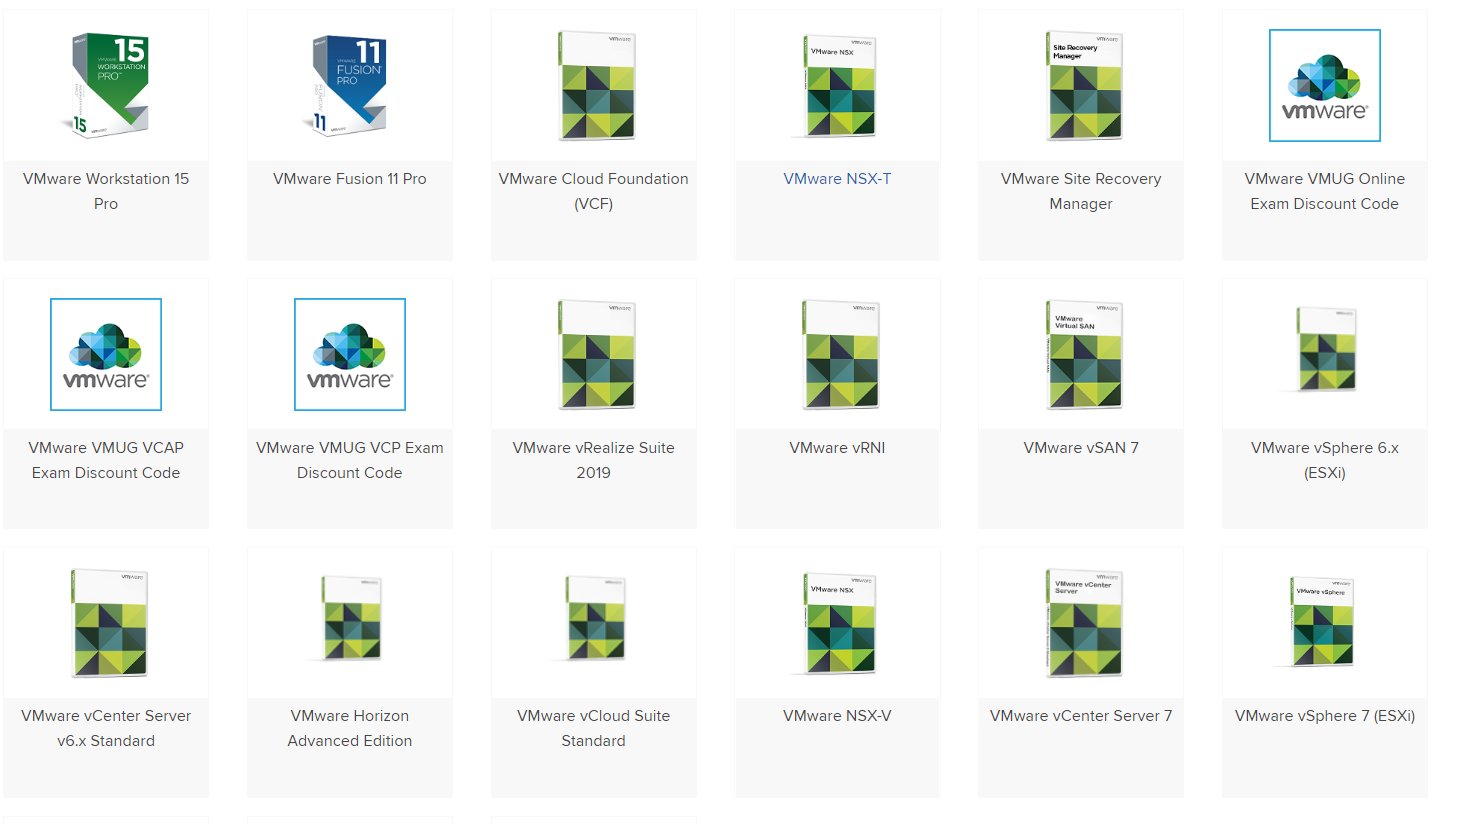
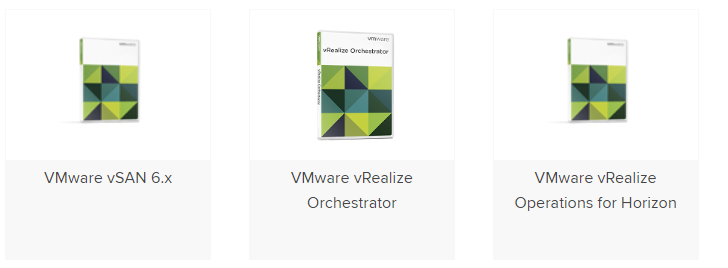
Bad News: vMug Evaluation licenses DO NOT cover the VCP-DTM 2020 blueprint technologies! Considering VMWare want people to have hands on experience with their products, but won’t let you spin up a lab environment at home to use their latest innovations, I found it pretty disheartening to realise I’d spent $200 but wouldn’t be able to setup a home lab for JMP components:
You will not have evaluation licenses forAppVolumes, Instant Clones, UEM, RDSH Apps – these are only available under a Horizon Enterprise license, vMug only provides you Horizon Standard.
Sort of. You do get evaluation licenses for ESXi, View Connection Server, Identity Manager, View Composer and vCenter Server which will let you build a linked-clone lab environment and this will definitely help you . More on this further down.
Below pictures of what the software catalogue looks for vMug Advantage members:
It’s worth noting that, you’re experience may be with Horizon, or vROPS, or some other suite of products – but the focus of the Foundations exam is aligned with theVCP-DCV certification path– there are barely any questions on DTM related content. This threw me off (I failed it twice) – so be aware that you basically become ‘primed’ to study for the DCV path by virtue of undertaking the Foundations course.
Naively I had expected the Official Course Guide to provide a decent level of detail for what is covered in the Foundations exam but the book does not cut the mustard. I ended up relying on the below resources far more than the OCG, so below are my recommended study materials in order of preference. Good luck!
Study Materials for vSphere Foundations 6.7 2019
Undoubtedly the best resource you can use if the VMware Knowledge Base ; remember to filter each article by the release version you need. Exam questions are formulated from KB articles, so I recommend prioritising these as your primary material before referencing any related books, websites, third party study guides.
VMware Technical and Whitepapers cover Best Practice, Details Design Documents (DDD’s), Overviews and Explanations of all things VMware. I’d covering each exam topic but equally, taking notes from each paper for real-world application. Ask yourself which vSphere features your current client or workplace utilises and consider the ‘why’ behind each design decision. This’ll make your study a lot more relevant.
VMware Technology Network is a useful forum area moderating by VMware staff and there’s plenty of real world Q&A to reference.
Recommended Study Books
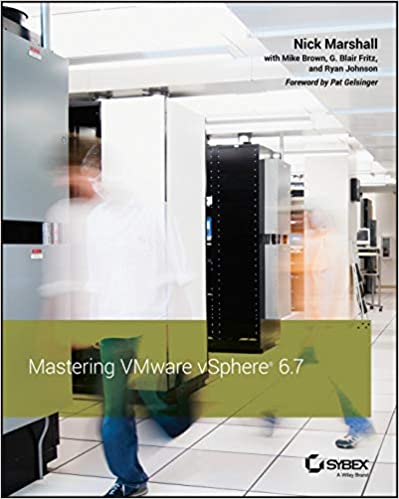
Mastering VMware vSphere 6.7 – Nick Marshall
Useful for: a great deep-dive reference into each feature in vSphere 6.7. Contains implementation steps, explanations and recommended practice for every feature covered in the Foundations exam blueprint.
vSphere 6 Foundations Exam Official Cert Guide – VMware Press
Good for: Giving a primitive understanding of each technology area. However, this book is littered with mistakes – from grammar to incorrect question answers and dodgy screenshots from legacy versions of the web client. It’s written in a conversational tone which is great, but massively let down by its brevity and lazy proofing. I suggest you don’t rely solely on this book (as I did…).
Building A vSphere Home Lab On Your laptop!
This guide to creating a complete VMWare home lab on your laptop is truly excellent. You build an 2-node vSphere home lab and can run it entirely embedded environment on your home laptop. You may need to buy some more RAM to accommodate it , but it’s money well spent and you can utilize your vMug evaluation licenses to run the latest vSphere components at home! In relation to the exam, it is well worth going through the motions installing and setting up the ‘core’ vSphere and Horizon components – this aids massively for both exams – believe it or not, there’s plenty of exam questions (in Foundations and VCP) focused around what happens during installing or what options/steps are built into the install process.
As a guide, I have a Dell XPS 15 i7, 32gb RAM, 500gb SSD (free space) and was able to run 2xESXi node w/ Composer and Connection server.
Step 3: What is the VMware Horizon 7: Install, Configure, Manage [V7.7] – On Demand training ?
Bearing in mind my experience will give a slight bias to this information – I have around 6 years experience with Linked clones, AppVols, and 1yr with Instant Clones and UEM in large enterprise environments. I personally found the training to be a bit below par considering the cost and I had higher hopes considering this is meant to be the ‘Real McCoy’ training bundle.
I paid £3000~ for the On Demand training, and yes that price included the vMug discount – and yes, I did feel like an absolute vMug for paying that. However, given my employers have paid me good contracting rates for several years, it was a small investment in the grand scheme of things, and I wanted to compare how they perform as a training provider and gauge how much new knowledge would be imparted to me for paying that kind of premium.
Course Delivery
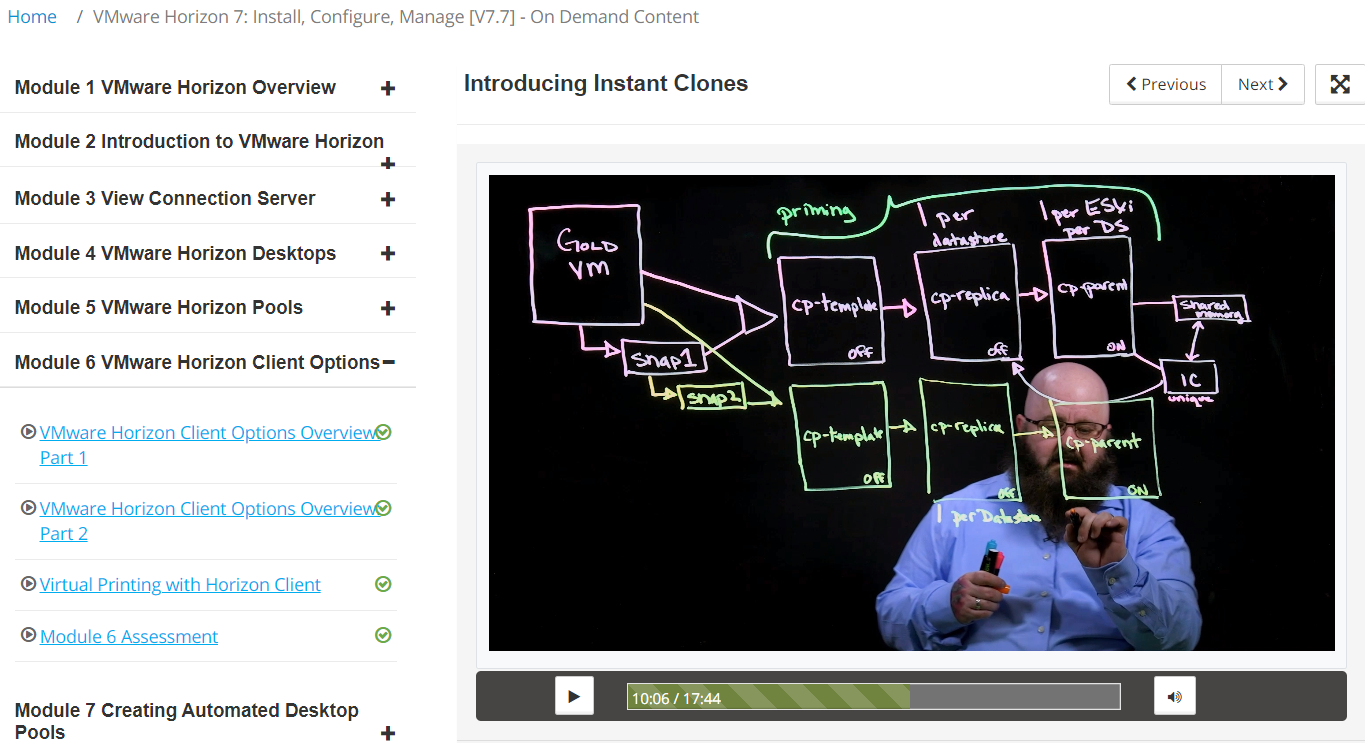
The training modules are hosted on the VMware Learning Zone portal, and broken down into 10-15 min videos with Linus Bourque taking you through (nearly) all components of Horizon, but not all DTM exam topics are covered in the Horizon 7.7 On Demand course. The below screenshot is an example of what to expect.
The delivery is sometimes a bit predictable – the instructor generally parrots what is written down on the slide adding some colour occasionally, however, the slides do cover about 70% of the course in high level, but I’ll reiterate vROPS and Identity Managerare not covered in the trainingor labs. It took me around 16 hours to complete the entire On Demand course.
Assessments
Each module has a few multiple choice questions which do not count towards your qualification. There is a Final Assessment after you complete all the labs and training videos which is covered further down this page.
My opinion?
For the more experienced Horizon admin 5+ years, I think you could skip this and save yourself the expense – but if you’re keen to have the VMware stamp of approval and be ‘fully’ certified, then you’ll have to pay for it. The training does hit the mark for someone with 6 months -1 year hands on experience of Horizon, which is what it’s geared for – you’ll get a good overview of the features of Horizon, what it can do, how it operates and you can walk away with that ‘how can I apply this at work?’ feeling.
For the more experienced administrator, I would avoid paying for it at it’s current price . Particularly if you can combine a home lab setup (for View Composer, Linked Clones) with real world experience in an enterprise. Personally, I will be avoiding paying for anymore VMware training for future VCP certifications. I preach as short sermon on my opinion of vendor training in general at the bottom of the article.
What are the On Demand lab exercises like?
When you give away £3k you half expect to be granted some decent learning experiences in return , after all, the fee is equivalent to 1 term at university – so what do you get?
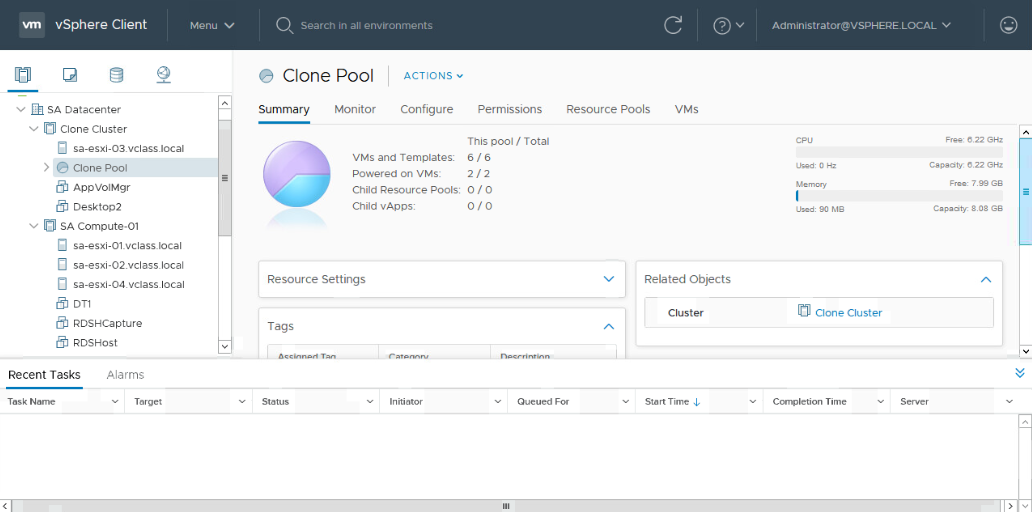
A vSphere environment with RDSH hosts, AppVolumes Manager, UEM and Win10/Win7 VM’s for creating Linked and Instant Clone pools.
This covers around 70% of what you need to study for the certification, but it doesn’t have any infrastructure for Identity Manager and vRealize Operations Manager – more on this later.
The tasks set during the labs are basic and anyone with 1-2 years experience will have already performed 99% of what is asked of you. Some example tasks include – installing the Horizon Agent into a master image, running OSOT to optimize the OS, create an AppStack and assign it, create an Instant Clone and Linked Clone pool, install UEM (now DEM) and test it – in short, much of the bread and butter tasks to stand up a Horizon environment.
Room for improvement?
Yes. If you want to give customers value for money, I would expect more real-world tasks to be included in the training (isn’t that the idea?). It’s also disappointing that vROPS and vIDM isn’t covered at all in the training or the labs – but accounts for about 30% of the exam? In general, the labs cover installing the components but not ‘from scratch’ as its target audience may have expected. Typically the server or manager element for a service is already setup, and you’re tasked with installing and configuring the agent component into a desktop. If VMware took the time to add a few extra steps to their existing walk through’s it would build a richer learning experience, and I think they fall short on this.
Suggestions for improving the labs
-Install and configure View Composer – create a DB and ODBC, install Composer, point it to the DB, link it to vCenter. This would help prime te understanding of the high level steps needed to configure other Horizon component likeAppVols, vCenter, View Connection Server.
-vROPS and Identity Manager are completely ignored. There is zero information in both the training and labs that covers Identity Manager or vRealize Operations Manager. The exam blueprint includes these topics but you are you’ll have to use the free VMware Hands On Labs (HOL) to familiarise yourself with these technologies and read the KB articles around installation and configuration.
-The DEM (UEM) labs should include how to create predefined settings, writing application templates, how to use the application profile tool and configuring Horizon Smart Policies, to name a few.
-How to update an AppStack and edit it’s properties to mount on different OS’s – valuable for techies involved in OS migration projects!
-How to create an instant clone RDSH farm and app delivery mechanism.
What is the VMware Horizon 7: Install, Configure, Manage [V7.7] – On Demand Assessment?
At the end of the On Demand training course there is a ‘Final’ assessment – don’t be worried by the ‘finality’ of it – it’s a 95 question assessment which repeats all of the questions from the earlier end of module tests – so you’re answering questions you’ve already experienced! Bonus: for each question you have the opportunity to correct your answer twice, so there’s a pretty low chance of failing this, but if you passed each end of module assessment without trouble, you will be fine. As far as I am aware, it can count towards being VMware Certified.
Step 4. Prepare and Pass the VMware Professional Horizon 7.7 Exam to achieve VCP-DTM 2020 Certified Status
If you’ve paid for the On Demand training course, you will receive a free attempt to sit the exam. If you choose not to undertake the training then you’ll need to schedule the exam through Pearson Vue and pay $250 per take. If you fail, you have to wait 7 days before your next resit.
Is the On Demand training enough to sit the exam immediately after completing it?
No it’s not, before you start revising for VCP-DTM 2020, watch the video series: Horizon 7.7 Professional Exam Prep in the VMWare Learning Zone. The video cites numerous VMware papers to reference for revision and as a silver lining, the presenter makes several exam question slips along the way .
My usual tact is to read the ‘Install/Configure/Overview-flavour’ KB articles of the given topic and make notes from these and then refer to books and third party study guides to reinforce your notes. Also, try to image the type of exam question that could be formulated from the KB article you’re reading.Equally, VMware can’t test people deeply on technologies that aren’t easily accessible through vMug or an evaluation license – in our case Instant Clones, AppVolumes, UEM and RDSH – so work within these limitations by not pouring hours into the edge-case issues or configurations – because it’s likely it won’t get covered. Remember it’s a Professional level cert, not Expert/Architect/Specialist.
I would personally recommend trying to answer the following questions for each technology area in the blueprint, and also refer to the ‘By the end of the training candidates should be able to‘ list which is available alongside the blueprints for the training courses (not the exam blueprint). This list is included in my study notes (highlighted yellow bullets) available below.
For example, for AppVolumes:
What are the OS and database minimum requirements for install and/or any pre-requisites?
How do you install the manager/agent and what does a typical/custom/complete installation include?
How do you perform routine operations (e.g. creating, updating, deleting an appstack).
What are a few typical troubleshooting issues you might come across with this technology whilst installing/configuring it OR whilst deploying/using it? e.g. Appstack not mounting, what happens when a user vs computer assignment conflicts, writable volumes not attaching and so fourth, what causes the agent component to fail connecting to manager/server, and so forth.
I hope you’ve found this article useful in deciding whether to study the VCP DTM 2020. This concludes the article, but below are my thoughts on vendor training and how it could be improved. If you have an opinion on that, I would be keen to hear it
The following is not targeted at VMware , but IT vendors in general and their training methods. Most enterprise IT vendors have a team of staff with 100’s of years of combined experience between them; so why do the customers and learners continue to be subject to unimaginative examination and training experiences? Can you remember an Associate, Professional or Administrator level certification that gave you raw, technical skills that you were able to apply at work? I can’t. It’s pretty unimaginative and lazy in 2020 to be expecting people to memorise minimum requirements or what steps are correct to perform action X? – It risks the brand reputation and risks losing your target audience’s interest in the vendor/technology/IT, so why do vendors continue to fall into this trap? What purpose does memorising a bunch of settings serve that is not replaced by Google?
A thought; we live in the attention economy, so getting 100% of someones attention to read your course guides, study your products and write about it online (the irony is not lost on me) is massively valuable – look at the click bait industry! IT vendors have willing participants who will voluntarily pay to indulge in their product developments, buy their books and pour hours of energy into the hope it will give them cutting edge skills – so why do vendors not capitalise on this? Training presents an opportunity to convert a learner/customer into an ambassador/salesman/woman but only if the recipient receives what they are looking for or what they have paid for – real world, bill-paying skills. If vendors took time to tap into their in-house support functions and correlate what common problems they see with their products, understand what real world customers are doing with their tech and how it addresses business needs, then ask themselves, how can we incorporate this into our training? that would be a good start.
I feel there is a gaping void in the lower-tier certs to address this and I’m yet to study a cert from any vendor that has broken this mould. I can’t speak for VCAP, CCNP, MCSE, CCEE level certs as I haven’t worked on these yet (and my expectations are already marred – see the problem?). The age of the Pavlovian memory games must end!
During a desktop login, often you need something to complete before another thing commences, this is often referred to as the execution order or login sequence.
Synchronous and Asynchronous processing is a tool that can help tweak the order in which a login is executed. The below example refers to the Application Launcher module in Profile Unity and the information is taken directly from Liquidware Support.
Asynchronous = Script 1,2 and 3 are executed all at once and left to run their – launch and forget about it! These scripts run as the rest of the desktop continues to load.
Synchronous = follow a predefined order. In Profile Unity the sequence number in the drop down menu defines when the script launches. Of course this is also dependent on the Filter that’s in play.
Question and Answers on Profile Unity Execution Order:
If Asynchronously is not selected the logon process will be paused until this process is finished and exited) – Does this mean that ProU will wait until ALL non-Asynch scripts are completed before it moves onto the next module?
Yes that is correct. The non-async script will wait until finish before launching next non-Asynch script and it will wait to finish before moving on to next module. (Note: the script could be launched During and After configuration).
For example, if we have 10 scripts, 5 of them with Asynchronous not checked, does ProU group these 5 scripts together and start them all at once (or by their ‘order’..?) and then wait for them to complete?
It starts them one by one and waits for them to complete before starting another script.
Profile Unity Login Sequence:
Computer Start-Windows load
Computer GPOs load
Windows Startup script – LwL.profileunity.client.startup.exe – This script updates the version of PU checks make sure there is no bad userinit.exe registry key in place etc.
(Idle waiting for user to login)
User login
User GPO’s run applying to the user
(After they finish running/applying)
userinit.exe runs
Pre-ProfileUnity logn scripts run (PU module- User defined scripts)
Client.exe and all modules from configuration (Left to right):
.
.
.
Application Launcher runs
(if Asynchronously is selected it will load next script/module without waiting for it to finish)
(if Asynchronously is not selected the logon process will be paused until this process is finished and exited)
Rest of the modules are loaded (Left to right)
.
.
.
Post-ProflleUnity Logon scripts are run (PU module – User Defined Scripts)
.
Then ProfileUnity client loads c:\windows\system32\userinit.exe which is actually desktop and explorer.exe
.
Then we run any rules that were marked to run (Post logon) that could be portability/printers/drive mappings etc.
Debugging Tool?
This tool can be helpful for debugging Profile Unity login issues
The following post runs through how to install and package Bloomberg Professional for a VDI environment. The below example uses Liquidware’s FlexApp to do this, but the ideas below are applicable to AppVolumes with VMware DEM to manage the post-deployment script.
Version: This is intended for users of Bloomberg Anywhere and covers how to package and deploy Bloomberg Professional (Full Terminal).
Bloomberg Professional contains Office Tools (MS Office Add-In) and a full standalone desktop client.
2. Run the installer on your provisioning VM selecting Private IP Network as the environment type.
3. Launch the software and click past the connection wizard until you reach the login screen – you don’t want your users to see/do this!
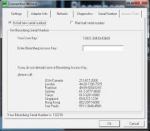
4. Bloomberg has minimum requirements of Read/Write to the following HKLM registry key and subkeys. If you have UAC enabled, you need to set permissions against these keys to allow users R/W access to:
These permissions can’t be captured using AppVolumes or FlexApp because they’re machine-level settings, so we need to use a post-deployment script to add the permissions to the registry after the app has mounted to the desktop at logon time.
There’s a few methods for doing this and at the time we
Configure a post-deployment script using subinacl
The following script should be saved as a .bat file.
For AppVolumes – ideally you should use DEM (formerly UEM) to run the script elevated, at logon or you may need to use Group Policy to run a logon script and scope it against the Bloomberg users.
Another (untested!) option, you could try editing the snapvol.cfg file within AppVolumes – if this works for you, please let me know!
The below can be copied into a .bat file to be executed after the application has been deployed to your VDI desktop(s).
1. Ensure subinacl and the .bat script sit in the same folder, ideally your netlogon share. If storing elsewhere, ensure the logged on user has rights to read/execute from that location.
2. Typically Bloomberg allows you to perform an APOD creation – this installs a generic license key which then lets a Bloomberg Anywhere user log in. If you need to configure this follow these steps: once you’ve installed the app on your capture VM, type CONN in the Bloomberg window to see the connection wizard. Under the Connections tab, click Submit. This will create a generic key code and allow the user to login using their Anywhere login creds


Leave a comment