
I wanted to share the maintenance procedure I used recently for a customer. We needed to power down their Horizon workload clusters and gracefully place all instant clone desktops into a maintenance state. I wasn’t aware of the vSAN Shutdown Cluster wizard feature and the magic that it performs. It saved me a lot of time. Several of my colleagues weren’t aware of the feature either. I’ve shared the process below.
Environment: vSphere 8.0U3 with vSAN, Horizon 8 2406, 100% Instant Clone.
Prepare Omnissa Horizon for Maintenance
The next steps explain how to power off instant clone pools, desktops, vCenter, and parent VMs. The process assumes all user sessions can be logged off and the pod will be unavailable. This is useful if you need to undertake cluster maintenance requiring a total power down of all ESXi hosts and Horizon workloads.
- Log off any active user sessions
- via Horizon Admin console > Sessions > select all available sessions > Logoff Session. Await completion and make sure no active sessions are in use.
- Place all desktop pools into Disabled state:
- via Horizon Admin console, select Desktops > select all pools > Disable Desktop Pools.
At this point, all desktop pools are unavailable for use and there are no users logged onto the platform.
The next step is to disable the Parent VMs. Although this step is optional, I include it here for awareness. From my testing, I found it prevented the instant clone VM’s from rebuilding when you shut them down.
- Disable Parent VMs
- via Horizon Admin console > Servers > select the vCenter instant > More > Disable ParentVMs.

This next step prepares the Horizon agent for powering off on an instant clone.
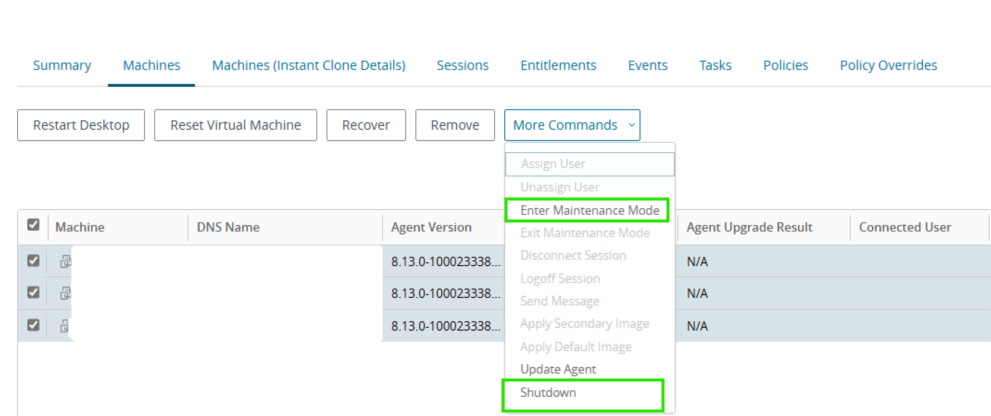
- Place all instant clone pool desktops into maintenance mode
- Select Desktops > target pool > Machines > select all > More Commands > Enter Maintenance Mode
By disabling provisioning, we avoid any new machines being rebuilt and generating problem VMs. We then power off all Horizon-managed VMs and the cluster hosts, and vSAN can be prepared for power down.
- Disable provisioning on all pools:
- via Horizon Admin Console > Desktops > select all pools > Disable Provisioning.
- Shutdown all instant clone pool VMs
- Select Desktops > target pool > Machines > select all > More Commands > Shutdown. Monitor the progress in vCenter.
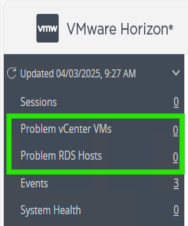
At this stage, all Horizon desktops and RDS hosts should be powered off, with vCenter performing no provisioning or Horizon-related actions.
We can now continue with preparing the vSAN cluster and all hosts to shut down. The shutdown wizard will:
- Turn off HA
- Power off all system VMs
- Disable cluster member updates from vCenter for all hosts in the cluster
- Pause state changes of vSAN objects
- Put each host into maintenance mode
- Power off each host
vSAN Cluster Shutdown Wizard
- Right click the Cluster object in vCenter > vSAN > Shutdown Cluster.

Note, if Shutdown Cluster is greyed out, browse to Configure > vSAN > Services > Shutdown Cluster

vSAN Restart Cluster
After successful maintenance, power the hosts back on via their iDRAC/iLO/Management interface.
All the hosts will power on and reconnect to vCenter in maintenance mode. To reinitialize vSAN and power the Horizon workloads back on, follow the below steps:
- Right click the cluster object vSAN > Restart Cluster.
- Once all hosts are participating in the cluster, select the cluster object > vSAN > Skyline Health > Test. Remediate any issues.
Power on Horizon Workloads
- Enable ParentVMs for all desktop pool
- via Horizon Admin Console > Servers > vCenter > More > Enable ParentVMs.
- Enable provisioning on all pools:
- via Horizon Admin Console > Desktops > select all pools > Enable Provisioning.
- Exit Maintenance Mode for all desktop pools
- Select Desktops > target pool > Machines > select all > More Commands > Exit Maintenance Mode
- Enable all desktop pools:
- via Horizon Admin console > Desktops > select all pools > Enable Desktop Pools.
At this stage all Horizon workloads should be powered on and healthy. Review the Problem vCenter VMs for any issues and test provisioning by deleting some instant clone VMs.
Summary
There was some trial and error involved when I initially approached this procedure. The majority of cluster maintenance rarely requires a full power down, so Horizon workloads can be vMotioned between operational hosts. In this instance, we can gracefully shut down all the instant clones. vCenter can manage the vSAN and host power down. There is no need to log on to the hardware until bring-up. I love getting feedback or other tips, so please comment below.
aria cloud dem euc horizon linux microsoft nsx omnissa security vcf vmware vsan vsphere


Leave a comment