Category: software

os, windows, linux, tools and utilies.

  • Windows Security Baselines – How to deploy controls to secure your domain

    Windows Security Baselines – How to deploy controls to secure your domain

    Background

    Recently, I was working with a small marketing agency, and they asked if I could assist them with implementing windows security baselines in an effort to gain CIS and ISO 2700 compliance. I’d never heard of these controls. Read about CIS controls here. They provide industry-tested security settings. These settings can be deployed via GPO or MDM for all major Microsoft OS’s, O365, and Azure environments.

    Purpose

    The below guide explains how to deploy the CIS benchmarks via group policy for an on-premise AD domain. It also explains how to validate your deployment using Policy Analyzer. Additionally, it provides some tips if you’ve never done this type of work and want to introduce some level of CIS compliance into your environment.

    1/ Getting started

    Define the scope for your deployment. Below are some questions myself and the client discussed to understand what we needed to do (example answers in green). It’s important to know these boundaries, so don’t accidentally deploy controls that aren’t required. Your audit report may guide you here, but remember – any introduction of new security settings is likely to cause some disruption at some point in time, so you should have a good awareness of where you are introducing the change and what services may be affected.

    • What OS’s are in circulation within the environment? Windows Server 2019 (2x Domain controllers and 12 member servers) Windows 10 1901 (5 client devices). It’s important to know whether you’re working on Domain Member or Domain Controller because server-specific CIS controls are separated by server role.
    • Do we want to deploy CIS controls to harden servers, desktops, domain controllers or all endpoints? We want to harden the DC’s and Servers only, no client devices.
    • Can we feasibly introduce the new security controls without any risk to production operations? Yes, create a new group policy OU structure with a test OU and a test virtual server.
    • If there is risk, how can we mitigate it and what is the rollback plan? Remove the GPO links and rebuild the test virtual server. In production, we’ll need to identify the problematic setting and remediate via group policy or local registry if necessary.

    2/ Download the Microsoft SCT and CIS benchmarks

    SCT contains the CIS benchmarks for all supported OS’s as well as several tools for helping you implement them. The only tool I had use for was Policy Analyzer.

    Download Microsoft SCT

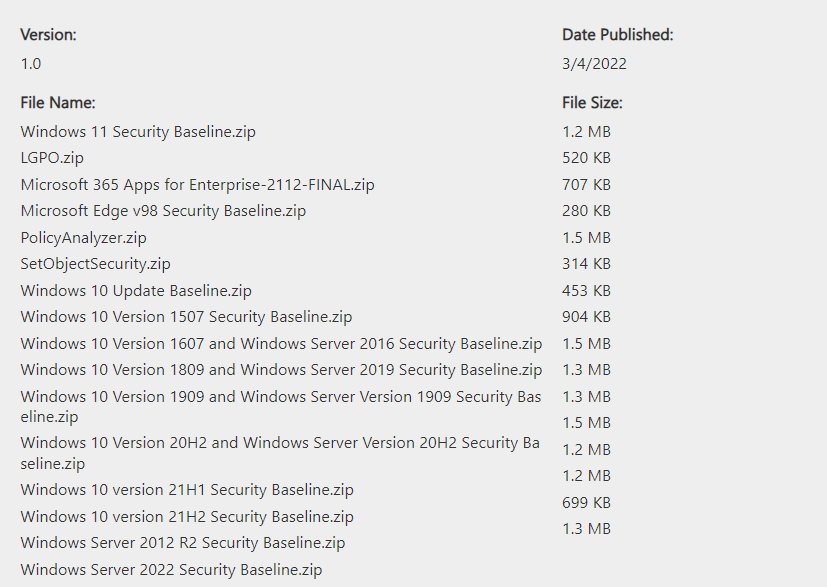
    The OS’s are paired Client + Server by their release cadence so you’ll notice Windows 10 1809 and Server 2019 security baselines in a single .zip

    Extracting the baselines for your environment you’ll see the following folder structure.

    Documentation: Contains Excel reports covering release notes and change records for the controls.

    GP Reports: *useful* HTML reports of the CIS security controls.

    GPO’s: the CIS controls as GPO’s, ready for importing into GPMC.

    Local_Script: Powershell scripts that apply the CIS controls to the local policy of a machine, useful if you want to test the settings in isolation (and not use group policy).

    Templates: ADML and ADMX files used by the CIS GPO’s.

    3/ Using Policy Analyzer to review conflicts

    At this point you’re ready to compare the incoming CIS controls against your existing GPOs and check for any conflicts. You’ll need to use Policy Analyzer.exe to perform the comparison and I recommend you take a backup of existing, actively used GPOs before getting started.

    • Take a backup of your existing Group Policy objects that are actively in use: it’s necessary to do this for 2 reasons; firstly, when you generate a comparison report in Policy Analyzer it’s much, much easier to identify where a conflict exists and remediate it when you have your existing GPOs individually compared instead of using ‘effective state’ (more on this in next step), secondly, you might screw up! So it’s always worth having a backup 🙂

    Once backed up, let’s import the CIS GPOs into Policy Analyzer, launch the tool and click Add > File > Add files from GPO(s)…

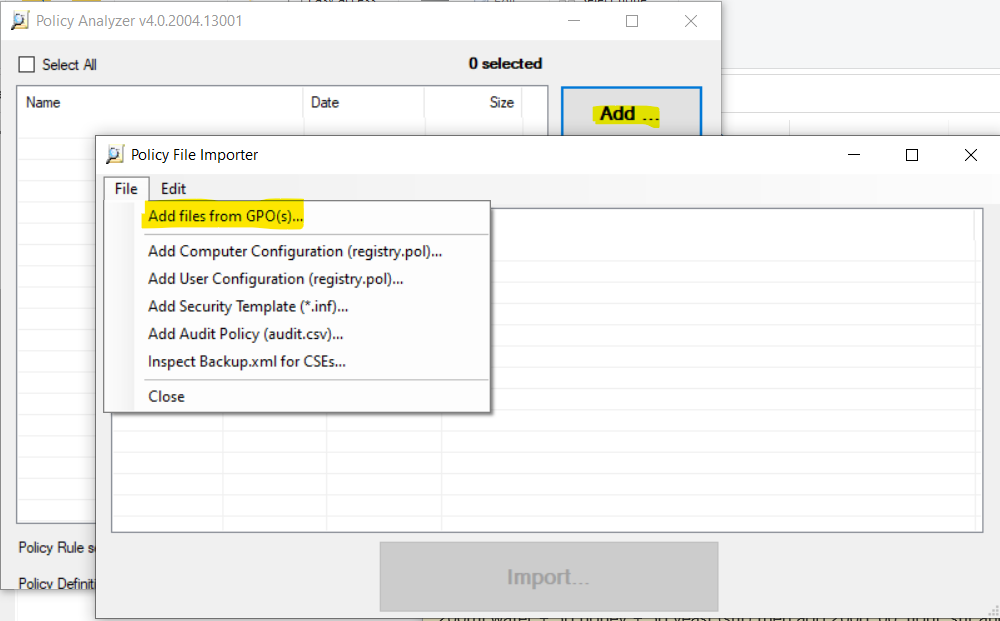
    Select the folder containing the CIS controls

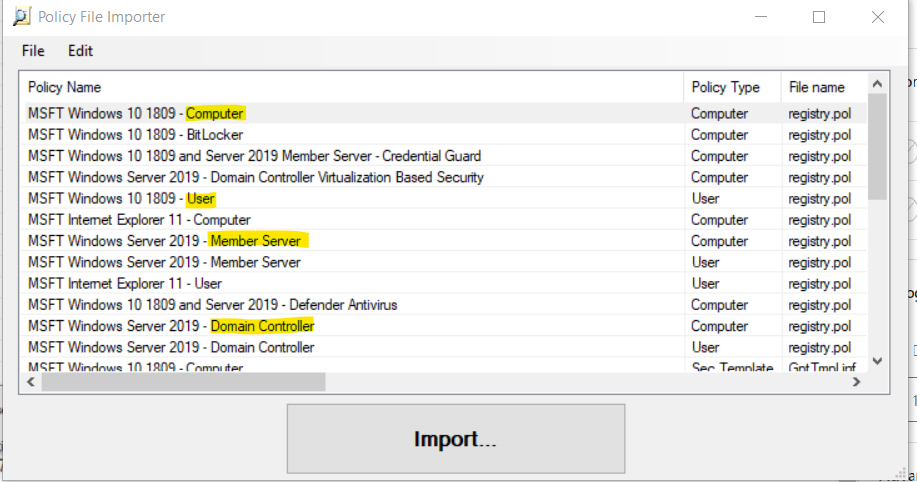
    Now select the relevant GPOs for your environment, our earlier scoping exercise should help here and as you’ll see below some policies are for member servers, domain controllers, user settings or computer settings – so be aware of the differences in the targeted objects or role of a given GPO.

    You’ll be prompted to save a .PolicyRules file – this is just a reference file for PA.

    Once complete, you’ll see an entry for your newly imported GPOs and you now have the option to compare the controls to the local machines ‘Effective state’. In the results you’ll see two columns, your baseline (the CIS GPO) and the Effective State (your local machines state with group policy applied). Conflicts are highlighted, Grey is no existing setting is configured.

    The default view is useful but it doesn’t show you which of your existing GPOs are conflicting with the CIS controls. To see this, we’ll need to import the GPOs you backed up earlier into Policy Analyzer. To do this, repeat the steps you’ve just taken to import the CIS GPOs, but point to your backed up GPO files and then save the .policyrules file. Re-run the comparison but this time don’t compare to the Effective State, instead select the CIS controls and your existing GPOs and click View/Compare.

    The view will now contain a column per-GPO, making it much easier for you to identify which policy contains the conflicting setting and adjust accordingly.

    Import CIS GPOs and ADMX/L templates into GPMC

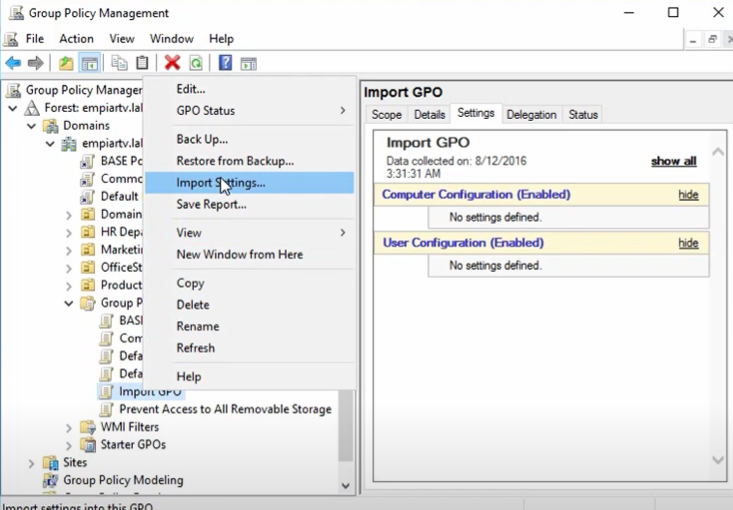
    At this point you’ve got the nuts and bolts to perform comparisons and find conflicts. I would recommend you do a Export > All results to Excel to keep a record of your domain state before you start meddling with group policy. Spend time reviewing the conflicts and reading through the new incoming settings, when you’ve resolved the conflicts (either by editing your existing GPOs, or muting the settings in the CIS GPOs) you now need to import the CIS GPO files into GPMC. Here is a useful guide for doing this alternatively, or (slower) you can manually create a new Group Policy Object > Right click > Import Settings and select the CIS GPOs one by one.

    Remember to also import the ADMX and ADML templates from the Templates folder into your central group policy store.

    Conclusion

    To recap, we identified the scope of devices you want to harden and what OS mix operates within your domain. We then extracted the baselines and compared them to the existing state of an endpoint and/or all existing GPOs to remediate conflicts, you’ve imported all the security policies into your GPMC console and are now ready to deploy the controls within your domain.

    At this point I would recommend you have some test machines to deploy the new GPOs to and monitor the progress. I hope this post has been of some use to you and good luck. If you’d like to make a donation you can do so below.

    https://www.buymeacoffee.com/desktopsurgery

    Cheers,

    Dave

  • To Hell and Back with Hybrid AD Join for VDI

    To Hell and Back with Hybrid AD Join for VDI

    *Update 22/01/22 After much effort spent getting this to work at a customer site, it turns out there was never any need to have conditional access enforcing VDI devices to be hybrid-joined. By turning off the conditional access policy that checks the device is Azure-AD joined, there was no longer any issue. Note, if you’re using a zscaler you’ll need to configure source IP anchoring as well.

    *Update 31/07/21 After migrating a customer from Appsense to VMware DEM I had to find a new method to perform the hybrid join. The below article now provides two methods for performing the join.

    Read this post if you’re having problems performing Hybrid Azure AD join on non-persistent VDI. This post covers the how to configure Hybrid AD join on VDI , how we discovered it was broken and a clean solution to fix it.

    The running environment was Windows 10 1909, VMWare Instant Clones on Horizon 7.10, with zScaler proxy (.pac files).

    For the solution, click here or scroll to end of article.

    How to configure Hybrid AD join and why it might be failing for you…

    In our case, hybrid AD join was always broken – we just hadn’t noticed because the device join was successful which is all that is required for O365 services to work (Outlook gets a license – everyone is happy!) but the user PRT token (which I’ll refer to as user-join) was failing – which, if you have InTune in place for MDM policies and all that fancy stuff – you may find these devices are broken when the VDI is in use.

    Microsoft offer very little guidance on how to implement Hybrid AD join on VDI but Google yields a lot of negative feedback from folks implementing this for VDI. This VMware thread was helpful in our discovery, and the guidance from Microsoft is helpful, but not as detailed as it should be.

    Microsoft’s suggestions are:

    Implement dsregcmd /join as part of VM boot sequence.

    DO NOT execute dsregcmd /leave as part of VM shutdown/restart process.

      Define and implement process for managing stale devices.

    We used a start-up task to perform /join. 

    A .bat file or powershell can perform the join as follows, and configure this to run as a start-up task. Note, the task should be ran under the context of the SYSTEM account, and ensure your network is configured to allow this traffic (see zScaler section).

    dsregcmd.exe /join

    Master Image

    You should ensure your master image does not perform an AAD join at all.  You should run the /leave command  as SYSTEM account  prior to sealing your image and taking a snapshot, although we would often forget to do this. Whether this contributed to the issues covered, I’m not sure. Additionally, some threads suggest your master image should not be domain-joined – in our case, the master image IS domain joined, but was NOT AAD joined.

    Use PSExec to perform a /Leave command as SYSTEM account:

    Psexec -I -s dsregcmd.exe /leave

    zScaler .pac on VDI for Hybrid AD Join

    If you’re using a zScaler to manage internet traffic you may find that Hybrid AD join fails because the traffic is sent from the VM’s under the context of the SYSTEM account and if no .PAC file is configured against that account, then it will fail (unless you allow unauthenticated traffic on your zscaler devices). If we also throw into the mix that Microsoft recommend you join AAD during device start-up – your user will not have authenticated to zScaler when the /join takes place, so you must configure this.

    On your master image, launch Internet Explorer as SYSTEM account, and then manually configure the .PAC file manually. Download PSTools and then run the following command from an elevated cmd prompt:

    Psexec -I -s “c:\program files\internet explorer\iexplorer.exe”

    The above steps explain how we were configured for Hybrid AD join BEFORE we discovered it was not working. Read on for the discovery, and adjustments we made. Click here for the solution.

    How to identify a VM has failed Hybrid AD Join

    As a large enterprise with multiple VDI sites managed by different teams, we discovered some sites were performing the /join during the ‘Desktop Created’ stage of the logon process (i.e. once the user is logged In and desktop shell fully loaded) – in these pools we saw the device join was successful,  but user join (PRT token) was unsuccessful – this is because  the user was not logging into an AAD-joined device, so the device was deemed unauthorized to receive a PRT token.

    1. Open cmd prompt and run: dsregcmd /status 
    2. Review the output –note you may also see that the Tenant Name is blank in your output. The device will show as joined, but no PRT/User join had taken place –

    Device State shows successful AAD join:

    User-join has failed and the AzureADPrt token is not present.

    Contrary to MS guidance we experimented with adding a /leave command at logoff – on these pools we saw the object in AAD was updated more accurately in Azure – the ‘Last Activity’ times reflecting the join/leave times of when the desktop sessions were in use.  Howeverthe underlying lesson here is that the device must be joined first then the user is logging into an authorized device and a second /join should take place to fetch the user PRT token.

    On the pools configured to use a start-up taskwe found the device join would periodically fail – but this became more frequent as time passed until we had complete failure of all devices in a given pool.

    VM template objects flooding Azure AD

    We searched AAD to compare on-prem device names to their records in AAD and discovered we had a ton of VM’s joining AAD under the machine name of itXXXX – this is the internal template object which is created by ESXi when a new snapshot is published to a desktop pool. AAD was being flooded with these objects every time we changed the snapshot on a desktop pool.

    VM’s were joining AAD successfully (device-join only) but their ID did not match their counter-part object in AAD – instead, it matched the internal VM template.

     At this point we knew that when a new snapshot was published, a new AAD object was being created with the VM’s template account ID. Additionally, it proved the /join was taking place too early in the logon process (at machine start-up) – and instead of joining the hostname of the VM that is provided by QuickPrep (e.g. PROD-VM-1)  the ID of the instant clone template was being used to join the machine to AAD.

    To verify this:

    1. Open AAD and search for device name: it

    Note, this applies to VMware Instant Clones environments only, Citrix and Hyper-V hypervisors will use a different provisioning process, check your vendor documentation to know what to search for)

    Template VM objects in AAD –

    Duplicate VM device ID’s

    Another symptom of this issue was VM’s would recycle their Device ID – we found the same Device ID (after the device had joined AAD) was in use by other VM’s in the same pool. Presumably this is a hangover from previous symptom.

    1. Take 2 VM’s from the same pool, open CMD prompt and run dsreg
    2. cmd /status, compare the device ID’s on both devices – are they identical?

    Verifying AAD Join process

    To check if your VM’s are joining AAD with an incorrect computer name:

    1. Check the local VM event log Applications and Services LogMicrosoft/Windows/User Device Registration for event ID 335.
    2. Note, the computer name is itXXXX , user SYSTEM.

    Let’s recap what we’ve learned so far:

    • VM’s are joining AAD with the wrong computer name
    • AAD is populated with stale records for our VM’s
    • Our VM’s are recycling device ID’s
    • The User-join (PRT token) is not working

    After several hours of toil, testing and swearing, We tried moving the /join to different stages of the logon sequence, but only found Start-up to be ‘successful’ for the device-join. During testing we removed the /join altogether – and low and behold, we discovered the VM’s were still joining AAD – this is because there are 3 scheduled tasks baked into the Windows 10 1909 OS to perform auto-AAD join. 

    Microsoft don’t tell you this in their VDI guide because they prefer ‘the Community’ to figure it out…they’re real nice like that.

    Configuring Hybrid AD for VDI the right way! #how-to-configure-hybrid-ad-join-for-vdi

    Method 1

    1/ Perform the /join operation TWICE, once at Start-up, and again before the desktop shell has loaded.This ensures the the Device and the User PRT token are both issued succesfully.

    2/ Ensure the dsregcmd.exe /join operation is managed by your profile management tool. Don’t try to mix combinations of scheduled tasks/group policy/profile tool.

    3/ Delete the Automatic Device Join scheduled task. This was the root cause of all our pain. The task will perform a join under user context and has 2 triggers – a ‘special event’ and at logon.

    4/ Always perform dsregcmd /leave on your master image. Ideally, avoid the master image from joining AAD in the first place.

    5/ (Optional) Add a /leave command at logoff of the VM. This is unsupported by Microsoft, the only benefit we found from including this was the ‘Joined’ and ‘Last Activity’ timestamp was kept up to date in Azure AD – but again, not supported.

    6/ (Optional) Set the machine GPO ‘Windows Components/Device Registration/Register domain joined computers as devices‘ to disabled. This helps keep things tidy and you can be confident the join is only handled by your profile management tool.

    **Alternative Method**

    I recently had to decommission Appsense for a customer and move them to VMware DEM. In doing so, the method described above had to be changed. Although DEM can run tasks at Startup of the VM (it hi-jacks the native group policy startup/logoff scripts) which isn’t suitable for performing a /join because the template account for the pool is then joined to Azure AD. Which we don’t want. Thanks to some feedback on the DEM forums, I’ve found the below method works nicely:

    1/ Configure a .bat file that has a /leave and /join. You’ll call this as the post-synchronization script when you configure the pool. Example file.

    cd c:\windows\system32
    dsregcmd.exe /leave
    SLEEP 10
    dsregcmd.exe /join

    2/ Make the file available on your master image, ideally in the C:\ root somewhere and configure it as the post-synchronization script for the pool.

    3/ You should now see the devices populate in AAD when the pool is being composed. When a user logs in , because the VM is now ‘trusted’ the PRT token should be issued. Microsoft does not support the /leave as part of non-persistent devices so I’ve ommitted this. It is possible to add a /leave command (perhaps as a shutdown script), but we’ve discovered no issues with leaving the devices joined in AAD indefinitely.

    Master Image configuration

    Step 1: Delete the Auto-Join scheduled task in Win 10 1909

    1. On your master image open task scheduler: Microsoft > Windows >Workplace Join
    • Delete the Auto-Join task – this must be deleted and not disabled – because it’s a system task.
    • The remaining 2 tasks should be left in their default state – they should not require any manual intervention. If these tasks are disabled or not present on your image – then check OSOT or group policy if these are being deleted by an upstream policy.

    Step 2: Remove your master image from AAD

    1. Launch psexec from an administrative command prompt using: psexec.exe -i -s dsregcmd.exe /leave
    2. You may see the below exit code 0.
    3. Confirm the /leave was successful by checking AAD – you should not see the machine account, and the /status output should be as below.

    /status output when device has left

    Step 3: Remove existing itXXXX or stale records from Azure AD

    1. Remove any of the stale device records from AAD. This should include the itXXXX devices , and any VM’s in pools your going to test in.

    Step 4 (optional): Bake your user profile configuration into the master image

    If you’re unlucky enough to use AppSense or a similar tool – you may have to bake your configuration into the master image. Other profile management tools may not require this step.

    Profile Management Tool Configuration

    Step 4: Configure the dsregcmd /join operations

    Start-up task:

    1. Configure the 1st /join operation during Start-up of the machine (or machine boot).

    2. Scope this to only apply to machines with your VM naming conventions – this ensure the correct devices join AAD, but also prevent the itXXX devices joining (or your master images).  If you have no profile management tool, then this might work with scheduled tasks or a group policy object, but we did not validate this.

    Pre-Desktop task:

    • Perform a 2nd /join operation during the ‘Pre-Desktop’ stage– this is the point at which user authentication has completed, but the desktop is still loading. This should ensure the PRT is issued to the device, and also provides a backup to one of the scheduled tasks (re-sync) which does the same thing.

    Has this fixed it for you?

    1/ We no longer need to delete ‘stale’ AAD objects – there is only 1 AAD object per VM. Each VM joins to the same AAD object – no duplication, no dodgy device ID.

    2/ When a new snapshot is published, we did not see the itXXXX devices appearing in AAD (clean joins!).

    2/ User-join was always successful – this is probably because the Auto-Join scheduled task is not interfering with the registration process.

    I hope this helps someone, if you find other solutions or suggestions to improve on this find I’d love to know