A customer running Horizon with Windows 10 recently inquired about performing in-place upgrades on their templates. Typically, I would recommend building a new template for a major OS upgrade; there’s often many GBs’ worth of redundant bloat that remains dormant in the file system after an in-place upgrade.This can be detrimental for storage, performance, and general housekeeping of the desktop image.
On this occasion, a new template build wasn’t feasible, so we had to go in-place.
Before starting, clone the VM and test the process first. It’s easy to break Windows 10 if firmware or BIOS settings are misconfigured in vCenter. The following steps assume prerequisites for Windows 11 are already in place, including a native key provider configured in vCenter.
For background information on vTPM in vSphere I recommend the Q&A on vTPM from VMware and the Broadcom guidance; albeit the latter doesn’t explain the disk partition issue covered below, so take this into consideration before proceeding.
Environment: VMware Cloud on AWS
Scale: This process is for a single VM and doesn’t cover automated/batch upgrading.
Operating System: Windows 10 Enterprise 22H2 to Windows 11 24H2.
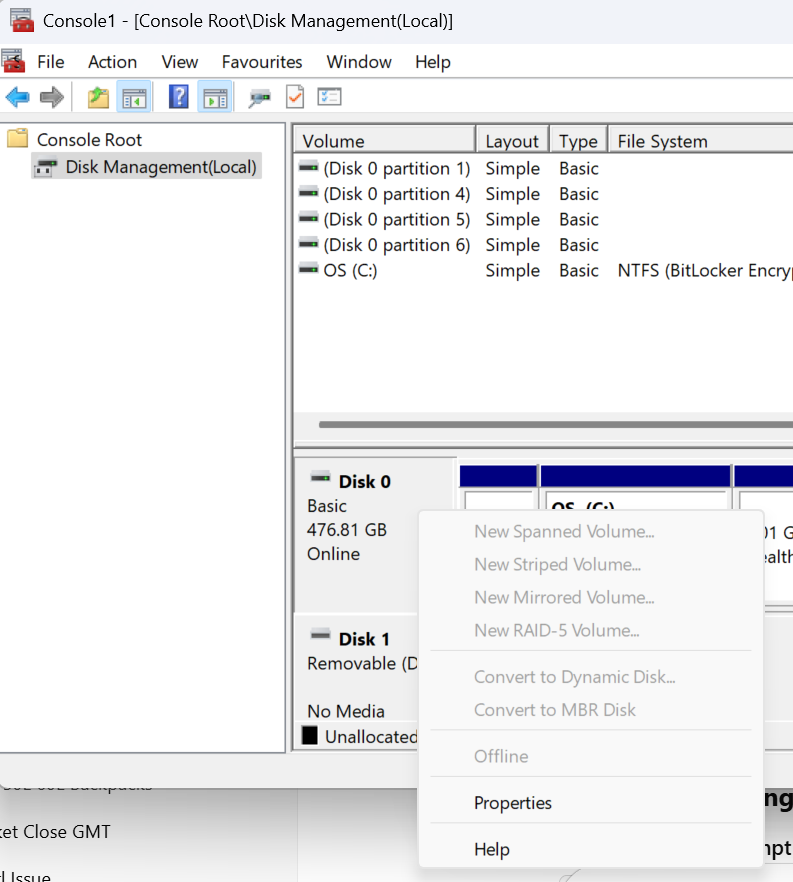
4. Once the partition type has been converted successfully, shut down the VM. vTPM devices and boot/firmware configuration changes can only be performed on powered-off machines.
5. Configure secure boot on the VM by browsing vCenter > select the VM > Edit Settings > VM Options > Boot Options and set the Firmware: EFI and Secure Boot: Enable > Save.
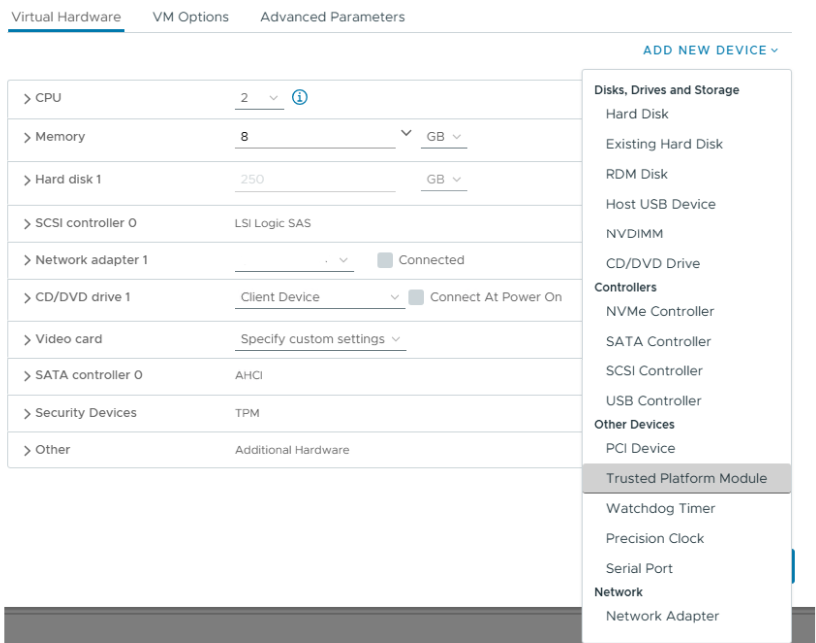
6. To add a vTPM device Virtual Hardware > New Device > Trusted Platform Module. The vTPM will add to the VM and you can see the default VMCA-provided certificates are pre-populated. No further steps are needed.
7. At this point the vTPM configuration is in place and the VM is ready to upgrade to Windows 11.
I decided to run the Windows 11 installation assistant to validate the machine configuration, and after the validation the wizard will automatically progress to an online upgrade to Windows 11 at the same build (Enterprise/Professional) as your existing installation.
Don’t forget to run Omnissa OSOT tool if you plan to use the virtual machine as an Horizon template.
Enterprise IT transformations from persistent to non-persistent desktops always bring new challenges with application delivery and profile management. I’ve used a variety of profile management tools from DEM and Profile Unity to Ivanti Environment Manager and FSlogix and they all have their respective strengths and weaknesses. I hope you find it useful!
Scenario: An application delivered as an AppVolume package requires user settings to be present on the local machine c:\ at launch time and roamed at logoff.
Typically I would tackle this issue using a combination of DEM logon tasks and DirectFlex. A shortcoming of DEM is that it cannot roam C:\ data using application templates. To work around this constraint, a logon task can be used to import the configuration files as a one-time event. DirectFlex can be enabled (optionally) if needed. At logoff, we can use a script to move the files to %roamingappdata% location. An application template can pick them up there.
Why didn’t this work?
There were various Windows Smart Screen and UAC challenges initially. Scripts needed unblocking, and I had to create a DEM Elevated Task to execute them. After some wrangling, the logon scripts worked, and the configuration was copied from a network share to the local machines C:\ at logon. Success! However, the export job failed. The copy job from C:\ to %appdata% failed sporadically, I suspect, due to the AppVolume package detaching from the VM before the files could be copied.
Enter:Symbolic Links
Symbolic links are like an evolution of the Windows shortcut. A symbolic link can point to a file or directory in another location and be deployed via group policy or DEM. These can be used as an elegant function to circumvent the aforementioned DEM configuration. It’s particularly useful for applications that don’t store their configuration in local or roaming %appdata%.
Example
In this scenario, we need a directory from a remote location to be available on a VM C:\ root after the Appvolume package has attached.
There are 2 types of symbolic links: soft links or hard links, and they can point to directories or files. In this scenario we’ll point to a directory that is known as a junction link
mklink /J "<location>\<dir>" "<\\UNC or <dir>"
The application will see the directory as a native file system folder:
Summary
This was a really useful discovery for me personally. No doubt there are plenty of veteran techies reading this and thinking, ‘Nobody reads the CMD prompt manual these days!’—and you’d be right. I feel somewhat naive for having not discovered this years ago, having wrestled with countless profile issues where an application writes to %Programdata% or C:\.
On this thought, one area where Ivanti Environment Manager shines is in managing these types of scenarios. It does a better job than DEM at picking up dynamic changes to non-appdata locations. Equally, where DEM only operates at logoff/logon and triggered tasks, Ivanti can capture on-the-fly changes to the operating system directories. However, there is an infrastructure footprint required to run Ivanti EM; which is where DEM shines in providing excellent value whilst displacing incumbent profile systems.
I hope you’ve found this useful; please comment below if you’ve had good or bad experiences with symbolic links!
*Update 22/01/22 After much effort spent getting this to work at a customer site, it turns out there was never any need to have conditional access enforcing VDI devices to be hybrid-joined. By turning off the conditional access policy that checks the device is Azure-AD joined, there was no longer any issue. Note, if you’re using a zscaler you’ll need to configure source IP anchoring as well.
*Update 31/07/21 After migrating a customer from Appsense to VMware DEM I had to find a new method to perform the hybrid join. The below article now provides two methods for performing the join.
Read this post if you’re having problems performing Hybrid Azure AD join on non-persistent VDI. This post covers the how to configure Hybrid AD join on VDI , how we discovered it was broken and a clean solution to fix it.
The running environment was Windows 10 1909, VMWare Instant Clones on Horizon 7.10, with zScaler proxy (.pac files).
For the solution, click here or scroll to end of article.
How to configure Hybrid AD join and why it might be failing for you…
In our case, hybrid AD join was always broken – we just hadn’t noticed because the device join was successful which is all that is required for O365 services to work (Outlook gets a license – everyone is happy!) but the user PRT token (which I’ll refer to as user-join) was failing – which, if you have InTune in place for MDM policies and all that fancy stuff – you may find these devices are broken when the VDI is in use.
Microsoft offer very little guidance on how to implement Hybrid AD join on VDI but Google yields a lot of negative feedback from folks implementing this for VDI. This VMware thread was helpful in our discovery, and the guidance from Microsoft is helpful, but not as detailed as it should be.
Microsoft’s suggestions are:
Implement dsregcmd /join as part of VM boot sequence.
DO NOT execute dsregcmd /leave as part of VM shutdown/restart process.
A .bat file or powershell can perform the join as follows, and configure this to run as a start-up task. Note, the task should be ran under the context of the SYSTEM account, and ensure your network is configured to allow this traffic (see zScaler section).
dsregcmd.exe /join
Master Image
You should ensure your master image does not perform an AAD join at all. You should run the /leave command as SYSTEM account prior to sealing your image and taking a snapshot, although we would often forget to do this. Whether this contributed to the issues covered, I’m not sure. Additionally, some threads suggest your master image should not be domain-joined – in our case, the master image IS domain joined, but was NOT AAD joined.
Use PSExec to perform a /Leave command as SYSTEM account:
Psexec -I -s dsregcmd.exe /leave
zScaler .pac on VDI for Hybrid AD Join
If you’re using a zScaler to manage internet traffic you may find that Hybrid AD join fails because the traffic is sent from the VM’s under the context of the SYSTEM account and if no .PAC file is configured against that account, then it will fail (unless you allow unauthenticated traffic on your zscaler devices). If we also throw into the mix that Microsoft recommend you join AAD during device start-up – your user will not have authenticated to zScaler when the /join takes place, so you must configure this.
On your master image, launch Internet Explorer as SYSTEM account, and then manually configure the .PAC file manually. Download PSTools and then run the following command from an elevated cmd prompt:
The above steps explain how we were configured for Hybrid AD join BEFORE we discovered it was not working. Read on for the discovery, and adjustments we made. Click here for the solution.
How to identify a VM has failed Hybrid AD Join
As a large enterprise with multiple VDI sites managed by different teams, we discovered some sites were performing the /join during the ‘Desktop Created’ stage of the logon process (i.e. once the user is logged In and desktop shell fully loaded) – in these pools we saw the device join was successful, but user join (PRT token)was unsuccessful – this is because the user was not logging into an AAD-joined device, so the device was deemed unauthorized to receive a PRT token.
Open cmd prompt and run: dsregcmd /status
Review the output –note you may also see that the Tenant Name is blank in your output. The device will show as joined, but no PRT/User join had taken place –
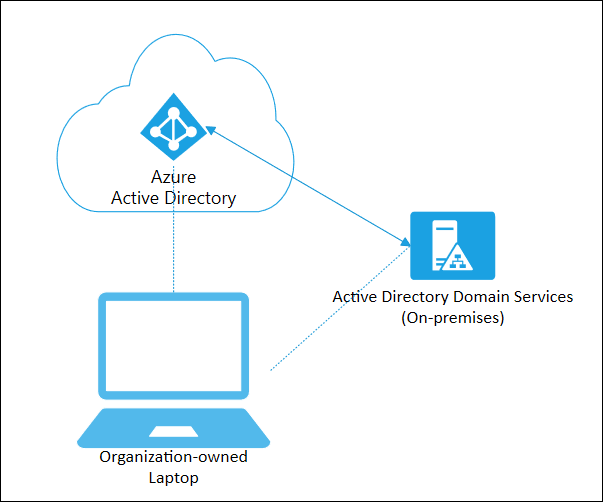
Device State shows successful AAD join:
User-join has failed and the AzureADPrt token is not present.
Contrary to MS guidance we experimented with adding a /leave command at logoff – on these pools we saw the object in AAD was updated more accurately in Azure – the ‘Last Activity’ times reflecting the join/leave times of when the desktop sessions were in use. However, the underlying lesson here is that the device must be joined first then the user is logging into an authorized device and a second/join should take place to fetch the user PRT token.
On the pools configured to use a start-up taskwe found the device join would periodically fail – but this became more frequent as time passed until we had complete failure of all devices in a given pool.
VM template objects flooding Azure AD
We searched AAD to compare on-prem device names to their records in AAD and discovered we had a ton of VM’s joining AAD under the machine name of itXXXX – this is the internal template object which is created by ESXi when a new snapshot is published to a desktop pool. AAD was being flooded with these objects every time we changed the snapshot on a desktop pool.
VM’s were joining AAD successfully (device-join only) but their ID did not match their counter-part object in AAD – instead, it matched the internal VM template.
At this point we knew that when a new snapshot was published, a new AAD object was being created with the VM’s template account ID. Additionally, it proved the /join was taking place too early in the logon process (at machine start-up) – and instead of joining the hostname of the VM that is provided by QuickPrep (e.g. PROD-VM-1) the ID of the instant clone template was being used to join the machine to AAD.
To verify this:
Open AAD and search for device name:“it“
Note, this applies to VMware Instant Clones environments only, Citrix and Hyper-V hypervisors will use a different provisioning process, check your vendor documentation to know what to search for)
Template VM objects in AAD –
Duplicate VM device ID’s
Another symptom of this issue was VM’s would recycle their Device ID – we found the same Device ID (after the device had joined AAD) was in use by other VM’s in the same pool. Presumably this is a hangover from previous symptom.
Take 2 VM’s from the same pool, open CMD prompt and run dsreg
cmd /status, compare the device ID’s on both devices – are they identical?
Verifying AAD Join process
To check if your VM’s are joining AAD with an incorrect computer name:
Check the local VM event log Applications and Services Log> Microsoft/Windows/User Device Registration for event ID 335.
Note, the computer name is itXXXX , user SYSTEM.
Let’s recap what we’ve learned so far:
VM’s are joining AAD with the wrong computer name
AAD is populated with stale records for our VM’s
Our VM’s are recycling device ID’s
The User-join (PRT token) is not working
After several hours of toil, testing and swearing, We tried moving the /join to different stages of the logon sequence, but only found Start-up to be ‘successful’ for the device-join. During testing we removed the /join altogether – and low and behold, we discovered the VM’s were still joining AAD – this is because there are 3 scheduled tasks baked into the Windows 10 1909 OS to perform auto-AAD join.
Microsoft don’t tell you this in their VDI guide because they prefer ‘the Community’ to figure it out…they’re real nice like that.
1/ Perform the /join operation TWICE, once at Start-up, and again before the desktop shell has loaded.This ensures the the Device and the User PRT token are both issued succesfully.
2/Ensure the dsregcmd.exe /join operation is managed by your profile management tool. Don’t try to mix combinations of scheduled tasks/group policy/profile tool.
3/ Delete the Automatic Device Join scheduled task. This was the root cause of all our pain. The task will perform a join under user context and has 2 triggers – a ‘special event’ and at logon.
4/Always perform dsregcmd /leave on your master image. Ideally, avoid the master image from joining AAD in the first place.
5/ (Optional) Add a /leave command at logoff of the VM. This is unsupported by Microsoft, the only benefit we found from including this was the ‘Joined’ and ‘Last Activity’ timestamp was kept up to date in Azure AD – but again, not supported.
6/ (Optional) Set the machine GPO ‘Windows Components/Device Registration/Register domain joined computers as devices‘ to disabled. This helps keep things tidy and you can be confident the join is only handled by your profile management tool.
**Alternative Method**
I recently had to decommission Appsense for a customer and move them to VMware DEM. In doing so, the method described above had to be changed. Although DEM can run tasks at Startup of the VM (it hi-jacks the native group policy startup/logoff scripts) which isn’t suitable for performing a /join because the template account for the pool is then joined to Azure AD. Which we don’t want. Thanks to some feedback on the DEM forums, I’ve found the below method works nicely:
1/ Configure a .bat file that has a /leave and /join. You’ll call this as the post-synchronization script when you configure the pool. Example file.
cd c:\windows\system32
dsregcmd.exe /leave
SLEEP 10
dsregcmd.exe /join
2/ Make the file available on your master image, ideally in the C:\ root somewhere and configure it as the post-synchronization script for the pool.
3/ You should now see the devices populate in AAD when the pool is being composed. When a user logs in , because the VM is now ‘trusted’ the PRT token should be issued. Microsoft does not support the /leave as part of non-persistent devices so I’ve ommitted this. It is possible to add a /leave command (perhaps as a shutdown script), but we’ve discovered no issues with leaving the devices joined in AAD indefinitely.
Master Image configuration
Step 1:Delete the Auto-Join scheduled task in Win 10 1909
On your master image open task scheduler: Microsoft > Windows >Workplace Join
Delete the Auto-Join task – this must be deleted and not disabled – because it’s a system task.
The remaining 2 tasks should be left in their default state – they should not require any manual intervention. If these tasks are disabled or not present on your image – then check OSOT or group policy if these are being deleted by an upstream policy.
Step 2:Remove your master image from AAD
Launch psexec from an administrative command prompt using: psexec.exe -i -s dsregcmd.exe /leave
You may see the below exit code 0.
Confirm the /leave was successful by checking AAD – you should not see the machine account, and the /status output should be as below.
/status output when device has left
Step 3:Remove existing itXXXX or stale records from Azure AD
Remove any of the stale device records from AAD. This should include the itXXXX devices , and any VM’s in pools your going to test in.
Step 4 (optional): Bake your user profile configuration into the master image
If you’re unlucky enough to use AppSense or a similar tool – you may have to bake your configuration into the master image. Other profile management tools may not require this step.
Profile Management Tool Configuration
Step 4: Configure the dsregcmd /join operations
Start-uptask:
Configure the 1st /join operation during Start-up of the machine (or machine boot).
2. Scope this to only apply to machines with your VM naming conventions – this ensure the correct devices join AAD, but also prevent the itXXX devices joining (or your master images). If you have no profile management tool, then this might work with scheduled tasks or a group policy object, but we did not validate this.
Pre-Desktoptask:
Perform a 2nd /join operation during the ‘Pre-Desktop’ stage– this is the point at which user authentication has completed, but the desktop is still loading. This should ensure the PRT is issued to the device, and also provides a backup to one of the scheduled tasks (re-sync) which does the same thing.
Has this fixed it for you?
1/ We no longer need to delete ‘stale’ AAD objects – there is only 1 AAD object per VM. Each VM joins to the same AAD object – no duplication, no dodgy device ID.
2/ When a new snapshot is published, we did not see the itXXXX devices appearing in AAD (clean joins!).
2/ User-join was always successful – this is probably because the Auto-Join scheduled task is not interfering with the registration process.
I hope this helps someone, if you find other solutions or suggestions to improve on this find I’d love to know


Leave a comment